Open to Debate 1(domestic topic) & Open to Debate 2(International topic)
additional Arirang TV(News)
Contents
Acknowledgements
Introduction
Suggestions to the teacher
Open to Debate 1 (Revised Edition) : 70 Korean Issues
Open to Dabate 2 (Revised Edition) : 70 International Issues
UNIT 01 Korea’s Greatest Hero UNIT 02 Smart Phone Addiction UNIT 03 An Evening of Pork, Rice & Soju UNIT 04 Most Stressful Day of the Week? UNIT 05 The Value of a Woman’s Work? UNIT 06 Rising Obesity in Korea UNIT 07 Plastic Surgery UNIT 08 Subway Suicides UNIT 09 Healthy Supplements UNIT 10 Korean Special Days for Couples UNIT 11 Are boys Better? UNIT 12 TV: Good or Bad Influence? UNIT 13 Foreign Car Ownership UNIT 14 Gambling & Suicide UNIT 15 English for kindergartners UNIT 16 Life Expectancy UNIT 17 Teenagers Smoking UNIT 18 Traffic Accidents in Korea UNIT 19 Adoption in Korea UNIT 20 Business & Social Responsibility UNIT 21 Planning for Retirement UNIT 22 Conscientious Objectors UNIT 22 Low Birth Rate UNIT 24 Sexual Harassment UNIT 25 Cleaning Up Dog Poop UNIT 26 Studying Overseas UNIT 27 Internet Etiquette UNIT 28 Soju = The National Drink? UNIT 29 Charitable Giving in Korea UNIT 30 Dog Owners & Dog Meat UNIT 31 Discrimination Based in Looks UNIT 32 What Is Happiness? UNIT 33 Spam Spam & More Spam! UNIT 34 The Gender Gap in Korea UNIT 35 US Troops in Korea UNIT 36 Korean Elderly Living Alone UNIT 37 The Physically Disabled in Korea UNIT 38 Not in My Backyard (NIMBY) UNIT 39 Do the Japanese Trust Koreans? UNIT 40 Foreign Visitors to Korea UNIT 41 20-Something Korean Women UNIT 42 A Bounty on Fake Goods UNIT 43 Taxes! UNIT 44 Trouble at Work UNIT 45 Divorce in Korea UNIT 46 Indebtedness UNIT 47 Pre-marital Sex UNIT 48 The High Cost of Dying UNIT 49 Yellow Dust UNIT 50 Miss Korea: A Sexist Contest? UNIT 51 College Admission for Sale? UNIT 52 Adultery Law Abolished UNIT 53 Sex Offenders: Punished Enough? UNIT 54 Wasted Welfare? UNIT 55 Prostitution in Korea UNIT 56 Career Students UNIT 57 Reduce Military Service? UNIT 58 Labor Unions UNIT 59 Organ Trafficking UNIT 60 Delayed Marriage Registration UNIT 61 Low Construction Standards UNIT 62 Korean PhDs UNIT 63 Childless Couples UNIT 64 Avoiding Foreigners UNIT 65 Transsexuals & Gender Registration UNIT 66 Abolish the Death Penalty? UNIT 67 How Transparent Is Korea? UNIT 68 Benefits of the FTA UNIT 69 Plagiarism in Korea UNIT 70 North-South Reunification
UNIT 01 The Five Biggest Regrets before Death UNIT 02 Dangerous Sports UNIT 03 Internet Addiction UNIT 04 Road Rage UNIT 05 Frivolous Lawsuits UNIT 06 Domestic Violence UNIT 07 Cage-Free Eggs and Animal Welfare UNIT 08 Wasted Food UNIT 09 Social Networking Services UNIT 10 Human Trafficking UNIT 11 Excessive Police Violence against Minorities UNIT 12 Bullfighting UNIT 13 Gun Violence in America UNIT 14 Wrongfully Imprisoned UNIT 15 Breastfeeding in Public UNIT 16 Sugar Daddies and Sugar Babies UNIT 17 Legalization of Marijuana? UNIT 18 The Blame for Internet Spam UNIT 19 Same-Sex Marriage UNIT 20 Transgender Restrooms UNIT 21 Asian Americans: Facing Discrimination? UNIT 22 Eating Live Animals UNIT 23 Cruelty to Animals UNIT 24 An Apology for Hiroshima? UNIT 25 Fur Coats UNIT 26 Discrimination against Muslims UNIT 27 Once a Cheater, Always a Cheater? UNIT 28 Finding Mr./Ms. Right UNIT 29 Bullying in Public Schools UNIT 30 The Death of Marriage? UNIT 31 Wealthy Pastors: Truly Serving God? UNIT 32 Proliferation of Drones UNIT 33 Future Foods UNIT 34 Grade Inflation UNIT 35 Underpaid Actresses UNIT 36 American Universities and Chinese Students UNIT 37 Cosmetics for Men? UNIT 38 The 40-Year-Old Virgin UNIT 39 Secret Lottery Winners? UNIT 40 Male and Female: Attitudes toward Sex UNIT 41 Date Rape UNIT 42 Sexting UNIT 43 Cheating Students UNIT 44 Nonstop Hacking UNIT 45 Preserving the Rain Forest UNIT 46 Drug Cartels UNIT 47 Euthanasia UNIT 48 Israel versus Palestine UNIT 49 Democrats and Republicans UNIT 50 Racial Equality in the U.S. UNIT 51 Artificial Intelligence UNIT 52 An Apology for Slavery? UNIT 53 Climate Change UNIT 54 The British Monarchy UNIT 55 Climbing Mount Everest UNIT 56 World Religions UNIT 57 Scientology UNIT 58 China versus the U.S. UNIT 59 Illegal Immigration to the U.S. UNIT 60 The Death Penalty UNIT 61 Religious Veils in Public Places UNIT 62 Women’s Rights in Saudi Arabia UNIT 63 Indian Housewives: Shocking Rate of Suicide UNIT 64 Addiction to Prescription Drugs UNIT 65 Claiming the Arctic and Antarctic UNIT 66 India versus Pakistan UNIT 67 The Sunni and the Shia UNIT 68 Chemical Weapons UNIT 69 A Colony on Mars? UNIT 70 National Foods
Point II 어떤 것을 입력하든 문자열로 입력되기 때문에 형 변환이 필요 int() : 정수형 변환, str() : 문자열 변환 등…
var1 = input() #4 입력
var1 = int(var1)
var2 = int(input()) #3 입력
print(3+var1+var2) #10 출력
2. 논리 자료형(Boolean Data)
Point I 논리 자료형 : 참(True) 혹은 거짓(False)을 나타내는 자료형
True, False
Point II 비교 연산자 : 숫자나 문자의 값을 비교하는 연산자 주어진 진술이 참이면 True, 거짓이면 False
A == B #A와 B가 같다
A != B #A와 B가 다르다
A >= B #A가 B보다 크거나 같다
A <= B #A가 B보다 작거나 같다
A > B #A가 B보다 크다
A < B #A가 B보다 작다

print(3 == 3) #True
print(3 != 3) #False
Point III 논리 연산자 : 논리 자료형 사이의 연산
AND : 각 논리가 모두 True이면 결과가 True
OR : 각 논리 중 True가 존재하면 결과가 True
NOT : 논리값을 뒤집는 연산
3. 조건문
조건에 따라 특정 명령을 수행하는 구문
Point I if문 : 조건이 참이면 명령을 수행
if a >= 5:
    print("a는 5 이상입니다!")
Point II elif문 : 이전 조건이 거짓인 상황에서 조건이 참이면 명령을 수행
if a >= 5:
    print("a는 5 이상입니다!")
elif a >= 3:
    print("a는 3 이상 5 미만입니다!")
Point III else문 : 위의 조건에 해당하지 않는 모든 경우에 수행
if a >= 5:
    print("a는 5 이상입니다!")
elif a >= 3:
    print("a는 3 이상 5 미만입니다!")
else:
    print("a는 3 미만입니다!")
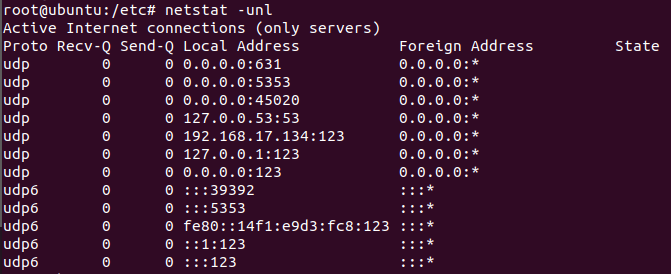
Network Time Protocol, 가장 오래된 인터넷 프로토콜, 네트워크를 통해 컴퓨터 간 시간 동기화를 위한 네트워크 프로토콜
사용 포트
123/UDP port, CVE-2013-5211
원리
NTP 프로토콜에 '몬리스트(monlist)'라는 명령어를 보냄 'monlist'라는 명령으로 요청받으면, 최근에 해당 서버에 접속한 최대 600개의 호스트들에 대한 최신 정보를 응답으로 보내줌 기본 monlist 요청은 8byte로 가능, 수백~수천 배의 응답
찾는 방법
nmap 등의 스캐닝 툴
예시
프랑스에서 초당 400Gbps 규모의 DDoS 공격 탐지(2014년 2월 13일) NTP 프로토콜을 이용한 증폭 공격 사례 대량의 정보를 요청하는 명령 전송하여 대량의 응답 받음
해결 방안
NTP 서버가 취약한 버전일 경우 NTP-4.2.7p26 이상 버전으로 업그레이드
Intro
NTP에 대해 이해하고 서버 구축하기
서버의 설정
1. NTP 서버 설치
2. 파일 설정(/etc/ntp.conf 변경)
3. 방화벽 허용 및 서비스 시작
클라이언트 설정
1. NTP 서버 상태 확인(ntpq -p)
2. NTP 서버 시간 동기화(ntpdate 서버 IP주소 명령)
NTP 서버 설정
NTP server: 192.168.17.134
NTP client: 192.168.17.145
NTP DRDoS Attack 기본 원리
공격자가 자신의 IP를 희생자 IP(client IP)로 바꿔서 NTP에게 시간을 질의
NTP는 클라이언트에게 시간을 알려줌
해커가 클라이언트 IP로 NTP에게 monlist를 요청
클라이언트에게 600개의 정보가 날라감
yum: Yellowdog Updater Modified, rpm 기반의 시스템을 위한 자동 업데이트 및 패키지 설치/삭제 도구
sudo apt-get install yum
1. 서버 및 클라이언트에 NTP 설치
# yum -y install ntp 혹은
apt install -y ntp
2. NTP 서버 설정
root@ubuntu:/etc# vi ntp.conf
# /etc/ntp.conf, configuration for ntpd; see ntp.conf(5) for help

driftfile /var/lib/ntp/ntp.drift

# Leap seconds definition provided by tzdata
leapfile /usr/share/zoneinfo/leap-seconds.list

# Enable this if you want statistics to be logged.
#statsdir /var/log/ntpstats/

statistics loopstats peerstats clockstats
filegen loopstats file loopstats type day enable
filegen peerstats file peerstats type day enable
filegen clockstats file clockstats type day enable

# Specify one or more NTP servers.

# Use servers from the NTP Pool Project. Approved by Ubuntu Technical Board
# on 2011-02-08 (LP: #104525). See
http://www.pool.ntp.org/join.html
 for
# more information.
pool 0.ubuntu.pool.ntp.org iburst
pool 1.ubuntu.pool.ntp.org iburst
pool 2.ubuntu.pool.ntp.org iburst
pool 3.ubuntu.pool.ntp.org iburst

# Use Ubuntu's ntp server as a fallback.
pool ntp.ubuntu.com

# Access control configuration; see /usr/share/doc/ntp-doc/html/accopt.html for
# details.  The web page <
http://support.ntp.org/bin/view/Support/AccessRestrictions>

# might also be helpful.
#
# Note that "restrict" applies to both servers and clients, so a configuration
# that might be intended to block requests from certain clients could also end
# up blocking replies from your own upstream servers.

# By default, exchange time with everybody, but don't allow configuration.
restrict -4 default kod notrap nomodify nopeer noquery limited
restrict -6 default kod notrap nomodify nopeer noquery limited

# Local users may interrogate the ntp server more closely.
restrict 127.0.0.1
restrict ::1

# Needed for adding pool entries
restrict source notrap nomodify noquery

# Clients from this (example!) subnet have unlimited access, but only if
# cryptographically authenticated.
#restrict 192.168.123.0 mask 255.255.255.0 notrust


# If you want to provide time to your local subnet, change the next line.
# (Again, the address is an example only.)
#broadcast 192.168.123.255

# If you want to listen to time broadcasts on your local subnet, de-comment the
# next lines.  Please do this only if you trust everybody on the network!
#disable auth
#broadcastclient
해당 부분 주석 처리하여 설정 변경
# restrict -4 default kod notrap nomodify nopeer noquery limited # restrict -6 default kod notrap nomodify nopeer noquery limited
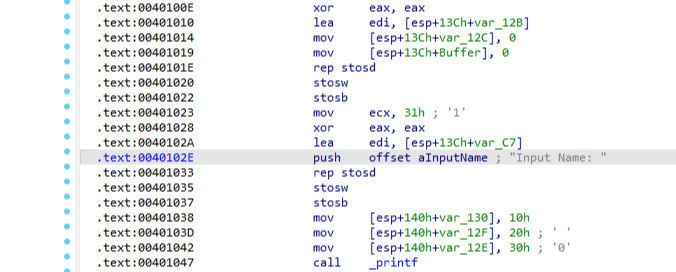
개요 * Easy_KeygenMe.exe 파일 실습 1. 레지스터 활용 분석 - 메모리 주소 및 스택 프레임의 이해 - ESP(스택 포인터), EBP(프레임 포인터), EIP 등 개념 정리 2. 어셈블리 명령어 이해 및 알고리즘 분석 - Pseudo code 기반 소스코드 작성
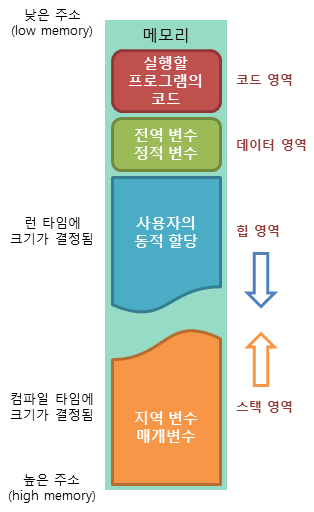
목차 0. 파일 버전 확인(32bit, 64bit) 1. 정의된 데이터(db) 2. 어셈블리어: CMP, LEA, TEST, XOR, MOV, MOVZX, MOVSX 3. 메모리의 구조 1) 코드 영역 2) 데이터 영역 3) 힙 영역 4) 스택 영역 - 레지스터: ESP, EBP, EIP, ECX, EAX 4. IDA 메모리 주소 표시 차이
Distributed Reflection Denial of Service (분산 반사 서비스 거부 공격)
특징
출발지 IP를 위조(Source IP Spoofing)
공격자는 IP를 공격 대상으로 Spoofing, 대량의 공격 요청을 반사 대상(서버 등)에 보냄
→ IP를 기반으로 공격을 방어하거나 공격자 역추적이 어려움
다수의 정상 동작 서버에 공격 트래픽 발생시켜, 정상 트래픽과의 구분이 어려움
공격 트래픽이 수백 Gbps 이상의 대규모로 발생하여, 탐지 하더라도 방어하기 어려움
UDP 기반 증폭 공격
DNS
개념
Domain Name System, 호스트와 도메인 이름과 아이피 주소와의 변환을 수행할 수 있도록 만들어진 주소 변환 프로토콜
사용 포트
53/UDP port, CVE-2006-0987
원리
DNS 레코드 값을 서버에 재귀적인 방식으로 질의를 하여 찾을 수 있음 DNS 서버에 dig 명령을 이용해 ANY 타입의 쿼리로 질의를 보냄(취약한 서버 찾기) DNS 서버는 질의를 받은 도메인과 관련된 모든 타입의 레코드 정보를 보내줌(대량의 응답) * dig 명령: DNS 질의응답이 정상적으로 이루어지는지를 확인 점검하는 경우에 주로 사용
기존 DNS 프로토콜: 512byte로 사이즈 제한 확장 버전인 EDNS: 4096byte까지 전송이 가능하여 더 큰 증폭 효과를 만들 수 있음
찾는 방법
DNS 서버에 dig 명령을 이용해 ANY 타입의 쿼리를 보내 취약한 서버 찾음
NTP
개념
Network Time Protocol, 가장 오래된 인터넷 프로토콜, 네트워크를 통해 컴퓨터 간 시간 동기화를 위한 네트워크 프로토콜
사용 포트
123/UDP port, CVE-2013-5211
원리
NTP 프로토콜에 '몬리스트(monlist)'라는 명령어를 보냄 'monlist'라는 명령으로 요청받으면, 최근에 해당 서버에 접속한 최대 600개의 호스트들에 대한 최신 정보를 응답으로 보내줌 기본 monlist 요청은 8byte로 가능, 수백~수천 배의 응답
찾는 방법
nmap 등의 스캐닝 툴
예시
프랑스에서 초당 400Gbps 규모의 DDoS 공격 탐지(2014년 2월 13일) NTP 프로토콜을 이용한 증폭 공격 사례 대량의 정보를 요청하는 명령 전송하여 대량의 응답 받음
해결 방안
NTP 서버가 취약한 버전일 경우 NTP-4.2.7p26 이상 버전으로 업그레이드
SSDP
개념
Simple Service Discovery Protocol, UPnP(Universal Plug and Play) 프로토콜에서 근거리 혹은 인터넷에 연결된 디바이스를 찾는데 사용되는 프로토콜
사용 포트
1900/UDP port
원리
SSDP를 이용해 네트워크 서버나 정적인 호스트 설정 없이 디바이스 탐지가 가능(like DHCP, DNS) M-Search 메서드를 이용하여 멀티캐스트 방식으로 로컬 네트워크에 연결된 디바이스 조회 가능 응답 패킷에는 다양한 정보 포함(e.g. 헤더, 배너정보 OS, UUID 정보) 40byte 정도의 M-Search 요청에 대해 서버는 평균적으로 30배 이상의 크기를 갖는 응답을 보내줌
찾는 방법
UDP 1900번 포트로 SSDP M-Search 패킷으로 인터넷 스캐닝하여 서버 찾음
SNMP
개념
Simple Network Management Protocol, 네트워크 디바이스를 관리하는 목적으로 만들어진 프로토콜, 네트워크 구성/성능/장비/보안관리가 가능 기존: 네트워크 디바이스의 모니터링은 ICMP와 같은 프로토콜을 사용 신규: 네트워크가 복잡해짐에 따라 더 효율적으로 네트워크 디바이스를 관리하기 위함 대량의 트래픽을 유발하는 명령 전송하여 대량의 응답 받음
사용 포트
161/UDP port
원리
장비 관리에 접근제어는 SNMP 패킷의 community 필드의 값으로, 보통 public과 같은 값으로 세팅 GetBulkRequest 명령을 이용 테이블에 있는 객체데이터를 요청하는 GetBulkRequest 명령을 반복적으로 수행 70byte의 GetBulkRequest 요청으로 최대 수만 byte의 응답을 받음
찾는 방법
community 값을 public으로 SNMP 패킷을 생성하여 스캐닝하여 증폭 공격에 이용 가능한 서버 찾음
Chargen
개념
Character Generator Protocol, 클라이언트의 요청에 대해 랜덤한 개수(0-512)의 문자열을 응답으로 보내주는 프로토콜
사용 포트
19/UDP port (네트워크 연결에 대한 디버깅, 대역폭 테스팅 등에 사용)
원리
60byte의 요청 패킷에 대해 랜덤한(74~1472bytes) 크기의 응답을 보내줌 (수백 배 정도의 증폭 효과)
찾는 방법
nmap 등의 스캐닝 툴
Others
NetBios
PC의 이름 등록(name registration)과 resolution을 수행하는 프로토콜의 디버깅을 위한 nbtstat 명령 이용
약 3배 정도의 증폭 효과
QOTD
Quote Of The Day, CharGen 프로토콜과 거의 유사한 형태
17/UDP port
TCP SYN Flooding
공격자가 IP를 목표물로 설정
반사 서버로 Syn 요청
반사 서버는 목표물에게 SYN+ACK 보냄
일정 시간 이후 목표물이 SYN+ANK 재전송(TCP 연결 특성상)
P2P
프로토콜별 증폭 공격이 가능한 이유, 공격 기법
공격자는 보통 네트워크 스캐너를 이용하여 증폭 공격에 이용할 취약 서버 리스트를 확보
(e.g. 디바이스 검색엔진 Shodan 이용)
과정
증폭 공격에 대한 공격 대상이 네트워크에 존재하는 경우
공격에 사용되는 서버가 네트워크에 존재하는 경우
공격자가 네트워크에 존재하는 경우
보안 대책
ISP에서 IP Spoofing 패킷 진입 불가(Ingress Filtering) 설정
네트워크 보안 장비(e.g. 방화벽)에서 동일 IP에 대해 일정 요청 이상은 차단하도록 설정
NTP의 경우 monlist 기능 비활성화(ntpdc -c monlist (NTP server add))
Proactive Attack Prevention
사전에 DRDoS 증폭 공격을 방어하는 방법
1) IP spoofing을 원천적으로 막는 안티스푸핑(Anti spoofing) 기법 적용
목차 1. 더 빠르고 쾌적한 공공와이파이가 온다! (220708) 2. 2022년 국가연구개발 우수성과 100선 선정 추진 (220711) 3. 가상융합경제 안전한 성장을 위해 보안업계 맞손 (220714) 4. 무인기 기반의 안전한 데이터 수집을 위한 클러스터 헤드 선출 보안 기술 동향 (220713) 4. 2022년 상반기 KISA 사이버 위협 동향 보고서 (220715)
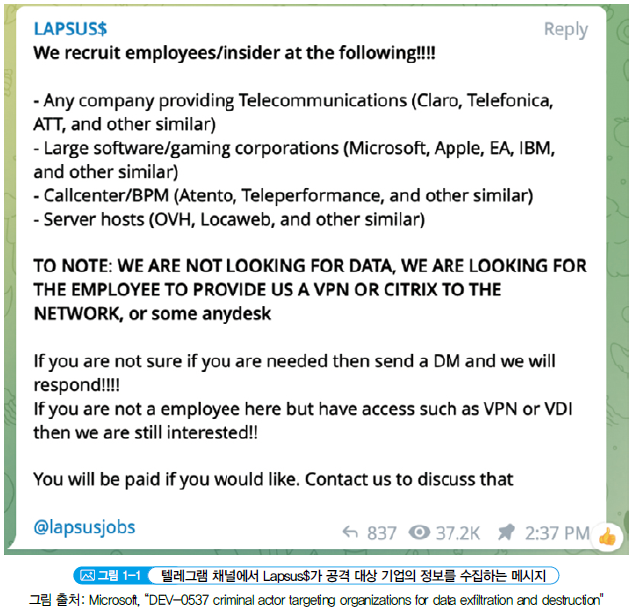
랩서스(Lapsus$): 가장 활발하게 활동한 랜섬웨어 갱단, 2021년 12월 브라질 보건부 해킹을 시작으로 올해 마이크로소프트, 엔비디아, 옥타(Okta) 등 글로벌 보안 전문기업 해킹
블랙캣(BlackCat): 2022년 상반기 새로 모습을 드러낸 랜섬웨어 갱단
+ 콘티(Conti), 락빗(Lockbit), ...
국내외 사이버 위협 동향
1. 세계 주요 기업 Lapsus$ 공격으로 인해 피해 발생
세계 주요 기업 Lapsus$ 공격으로 인해 피해 발생Lapsus$의 주요 공격 방식
2. 러시아-우크라이나 하이브리드 전쟁, 또 하나의 전쟁터가 된 사이버 공간
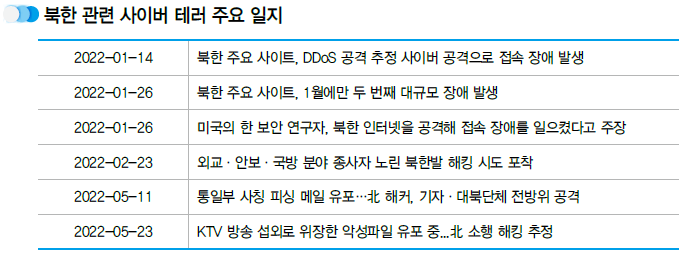
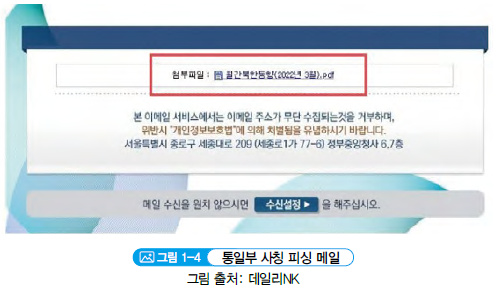
3. 사이버 공격 하는 북한, 사이버 공격 받는 북한
북한 연계 피싱 공격 지속: 2월, 국내 군사 연구 및 동북아 평화 협회인 것처럼 위장해 외교·안보·국방분야 전문가를 겨냥해 프로필을 보내달라면서 프로필 양식 문서로 위장한 MS 워드 악성 파일을 첨부한 피싱 메일 발송
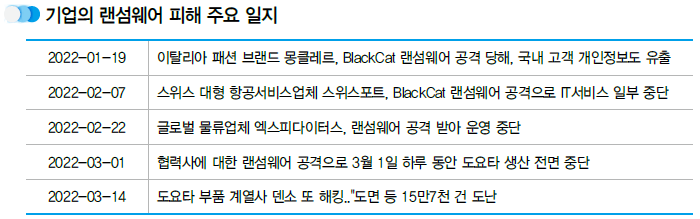
4. 여전히 기업 비즈니스의 큰 위협인 랜섬웨어
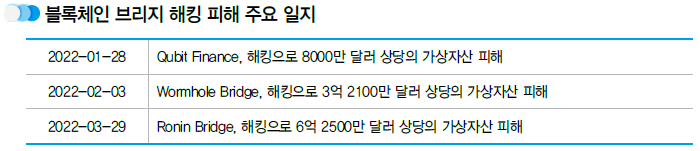
5. 블록체인 브리지, 해킹으로 대규모 가상자산 피해 잇따라 발생
블록체인 브리지에서 사고가 나는 이유: 복잡한 요구사항을 처리하고, 많은 가상자산을 보유해 주요 공격 대상이 됨
다양한 가상자산을 처리하는 크로스체인 DeFi에서 브리지를 많이 사용
6. 비밀번호 해킹과 피싱으로 피해가 계속되는 NFT
7. 클레이튼 기반 DeFi KLAYswap, 해킹으로 약 22억 원 피해
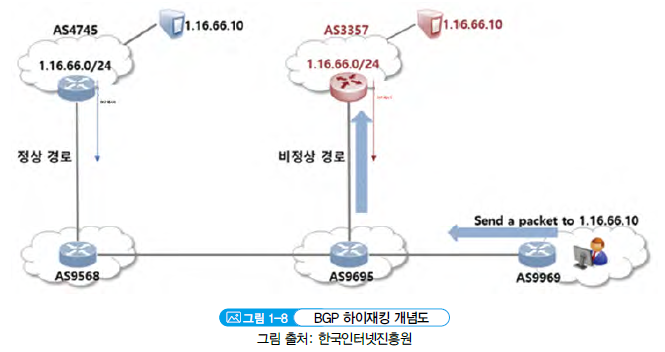
국내 대형 DeFi 중 하나인 클레이스왑(KLAYswap)에 대한 공격은 BGP 하이재킹 이용
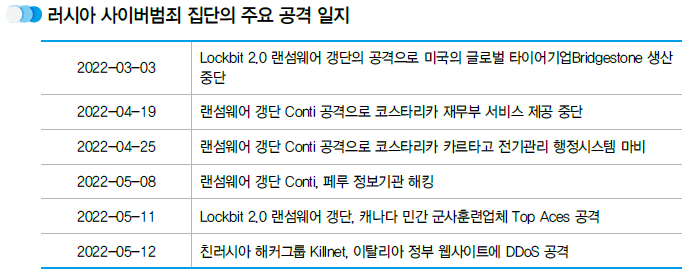
8. 공격 대상을 정부로 넓혀가는 러시아 사이버범죄 집단 - Conti, Lockbit2.0, Killnet
취약점 동향
1. 오픈소스 보안 라이브러리 잠재적 위협 - OpenSSL 취약점
2014년 4월 OpenSSL 라이브러리에 HeartBleed 취약점 발견
2022년 3월 OpenSSL 내 BN_mod_sqrt() 함수에서 연산시 무한루프가 발생하는 서비스 거부 취약점(CVE-2022-0778) 발견
2022년 5월 OpenSSL 내 명령 주입 취약점(CVE-2022-1292), 인증 오류 취약점(CVE-2022-1343), 비밀번호 오류 취약점(CVE-2022-1434), 서비스 거부 취약점(CVE-2022-1473) 발표
2. 방심이 불러온 취약점의 부활 - 사파리 취약점
특정 버전 이하의 소프트웨어를 사용하는 이용자 단말에서 악의적으로 제작된 웹 컨텐츠를 처리하면 임의의 코드를 실행할 수 있으며, 권한을 탈취하고 정보를 유출할 수 있음
대응방법: Zero-day 공격에 노출되어 있어, 보안패치 및 업데이트 발표시 최신 버전으로 적용
* macOS Monterey 12.2.1, iOS 15.3.1 and iPadOS 15.3.1, Safari 15.3(v. 16612.4.9.1.8 and 15612.4.9.1.8)
3. 협업의 도구의 숨은 위협 - 아틀라시안 컨플루언스 취약점
End-Point에 사용자가 계정을 만들어 가입하도록 허용되어 있는 경우 관리자가 아닌 사용자 또는 인증되지 않은 사용자가 컨플루언스 또는 데이터센터 인스턴스에서 html 필드를 대상으로 임의의 코드 실행을 통해 원격 명령어의 실행을 통한 이용자에 대한 2차 공격 및 등록된 자료의 유출이 가능함
공격자가 제공한 URI가 네임스페이스로 변환되어 OGNL 표현식 평가로 이어져 공격자가 임의의 명령어를 수행할 수 있음
* Atlassian: 소프트웨어 개발 및 협업 도구
[참고] Log4j 위협 대응 보고서 v1.0
21년 12월, 全 세계를 공포로 몰아넣을 만한 심각한 취약점 공격 기법이 Github에 공개되었다. 당시 공개된 공격 기법은 Log4j라는 오픈소스 프로그램이 가지고 있는 취약점을 악용하는 것이었다.