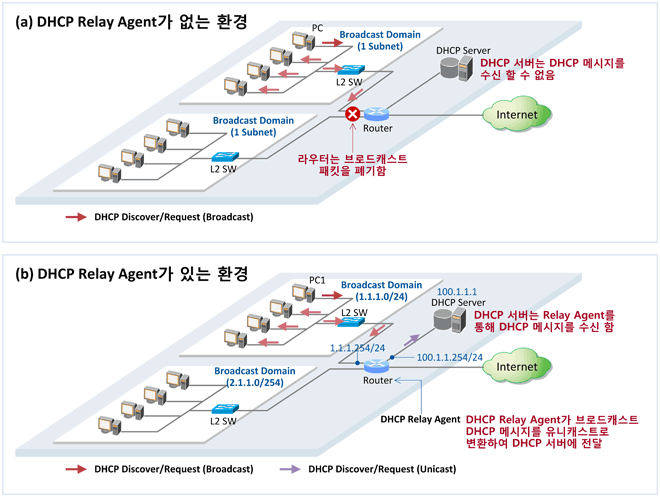
클라이언트가 DHCP 서버를 찾기 위한 패킷, Broadcast로 전송 LAN 상에 DHCP가 있는지 찾는 과정
변환
단말이 브로드캐스트 메시지를 보내면, DHCP Relay Agent가 수신하여 유니캐스트로 변환 (SIP=DHCP Relay Agent, DIP=DHCP Server) → DHCP 서버로 전달
Offer
기본
서버가 Discover 패킷을 받았으면, 자신이 임대해줄 수 있는 네트워크 정보와 함께 자신의 IP 전달, Broadcast
변환
DHCP 서버가 DHCP Relay Agent로 유니캐스트를 보내면, 이를 수신한 DHCP Relay Agent는 브로드캐스트로 변환해서 단말로 전송
Request
기본
DHCP 서버에서만 패킷 전달, Broadcast
변환
단말이 브로드캐스트 메시지를 보내면 DHCP Relay Agent가 수신해서 유니캐스트로 변환 (SIP=DHCP Relay Agent, DIP=DHCP Server) → DHCP 서버로 전달
Ack
기본
DHCP가 최종적으로 승인을 내리고 네트워크 정보 임대, Broadcast/Unicast
변환
DHCP 서버가 DHCP Relay Agent로 유니캐스트를 보내면, 이를 수신한 DHCP Relay Agent는 브로드캐스트로 변환해서 단말로 전송
* Request Broadcast 이유: 모든 DHCP 서버들이 DHCP Offer 메시지를 보내면서 해당 단말에 할당해 줄 IP 주소와 기타 정보를 내부적으로 저장해 놓기 때문, 선택받지 못한 DHCP 서버들이 이 IP 주소와 기타 정보들을 삭제할 수 있도록 하기 위함
# apt-get install isc-dhcp-server
# vi /etc/dhcp/dhcpd.conf
# 해당 옵션 추가(network range)
subnet 192.168.0.0 netmask 255.255.255.0 {
    range 192.168.0.10 192.168.0.20;
}
subnet 192.168.1.0 netmask 255.255.255.0 {
    range 192.168.1.10 192.168.1.20;
}
라우터 IP 주소, DHCP/BootP 릴레이 에이전트에 의해 채워지는 게이트웨이 IP 주소
DHCP server가 메시지에 대한 reply 패킷을 송신할 때, destination address를 'giaddr'로 사용
DHCP server가 DHCP Relay Agent로부터 DHCP 메시지를 수신하면, 메시지에 대한 reply를 giaddr(Gateway IP Address)로 보냄
부가 설명
Relay Agent가 request를 relay하기로 정했으면, 반드시 'giaddr' 필드를 검사해야 함
만약 'giaddr' 필드가 '0'이면, Relay Agent는 request를 'giaddr' 필드를 request를 수신한 인터페이스의 IP 주소로 채워야 함
즉, 'giaddr' 필드는 dhcrelay 데몬의 To client 인터페이스의 IP 주소가 됨
DHCP Server는 'giaddr'로 DHCP reply 패킷을 송신 → DHCP Server가 DHCP 메시지를 수신하지만, DHCP Relay Agent로 reply 패킷이 도달하지 않는다면 DA가 'giaddr'인 패킷을 수신할 수 있도록 네트워크를 변경해야 함
게이트웨이 주소(gi addr)에서 DHCP
DHCP: IP 주소 관리의 효율성과 편의를 위한 프로토콜
DHCP는 네트워크 내 개별 호스트 TCP/IP 통신을 실행하기 위한 IP 주소를 자동으로 할당(+ 구성 정보, ...)
단점: 서버와 클라이언트간 상호 인증 체계가 없음
-> DHCP spoofing, release 공격과 같은 네트워크 공격에 취약
취약점
DHCP Starvation
dhcpx -vv -i eth1 -A -D 10.10.10.50 -t 1 (축약) dhcpx -i eth1 -D 10.10.10.50 (eth1: 공격 보낼 network interface), 10.x.x.x: 공격 대상(DHCP 서버))
(DHCP pool 고갈 = IP 고갈)
대응
1) port security(switch 기술)(Client-Switch 사이)
특정 LAN 포트에서 허용할 MAC Address 지정(개수 포함)
발견 시 ① Protect(blocking) ② Restrict (blocking + trap message 관리자 전송) ③ Shutdown (위반 시 포트 차단 - 관리자 no shut 해제)
2) trusted port(DHCP Server-Switch 사이)
다른 포트에서 들어오는 DHCP 패킷이 감지되면, 패킷 버림 (물리적인 포트)
DHCP Spoofing
ettercap -i eth1 -T -M dhcp: 10.10.10.60 -150 / 255.255.255.0 / 10.10.10.50 (ettercap: LAN에 대한 메시지 가로채기 공격을 위한 보안 도구 IP 순서대로 (할당할 IP 대역 / 서브넷 마스크 / DNS Server)
참고: kali linux → dhcp server spoofing & starving attack
DHCP server의 취약점 판단하여 공격자가 DHCP 서버가 되어, 패킷 스푸핑
(DHCP 서버가 Default GW, DNS Server까지 할당 가능 → 공격자가 만든 서버 참조
참고 자료
유권정, 김은기, 네트워크 공격 방지를 지원하는 DHCP의 설계 및 구현에 관한 연구, 한국정보통신학회논문지
Network Time Protocol, 가장 오래된 인터넷 프로토콜, 네트워크를 통해 컴퓨터 간 시간 동기화를 위한 네트워크 프로토콜
사용 포트
123/UDP port, CVE-2013-5211
원리
NTP 프로토콜에 '몬리스트(monlist)'라는 명령어를 보냄 'monlist'라는 명령으로 요청받으면, 최근에 해당 서버에 접속한 최대 600개의 호스트들에 대한 최신 정보를 응답으로 보내줌 기본 monlist 요청은 8byte로 가능, 수백~수천 배의 응답
찾는 방법
nmap 등의 스캐닝 툴
예시
프랑스에서 초당 400Gbps 규모의 DDoS 공격 탐지(2014년 2월 13일) NTP 프로토콜을 이용한 증폭 공격 사례 대량의 정보를 요청하는 명령 전송하여 대량의 응답 받음
해결 방안
NTP 서버가 취약한 버전일 경우 NTP-4.2.7p26 이상 버전으로 업그레이드
Intro
NTP에 대해 이해하고 서버 구축하기
서버의 설정
1. NTP 서버 설치
2. 파일 설정(/etc/ntp.conf 변경)
3. 방화벽 허용 및 서비스 시작
클라이언트 설정
1. NTP 서버 상태 확인(ntpq -p)
2. NTP 서버 시간 동기화(ntpdate 서버 IP주소 명령)
NTP 서버 설정
NTP server: 192.168.17.134
NTP client: 192.168.17.145
NTP DRDoS Attack 기본 원리
공격자가 자신의 IP를 희생자 IP(client IP)로 바꿔서 NTP에게 시간을 질의
NTP는 클라이언트에게 시간을 알려줌
해커가 클라이언트 IP로 NTP에게 monlist를 요청
클라이언트에게 600개의 정보가 날라감
yum: Yellowdog Updater Modified, rpm 기반의 시스템을 위한 자동 업데이트 및 패키지 설치/삭제 도구
sudo apt-get install yum
1. 서버 및 클라이언트에 NTP 설치
# yum -y install ntp 혹은
apt install -y ntp
2. NTP 서버 설정
root@ubuntu:/etc# vi ntp.conf
# /etc/ntp.conf, configuration for ntpd; see ntp.conf(5) for help

driftfile /var/lib/ntp/ntp.drift

# Leap seconds definition provided by tzdata
leapfile /usr/share/zoneinfo/leap-seconds.list

# Enable this if you want statistics to be logged.
#statsdir /var/log/ntpstats/

statistics loopstats peerstats clockstats
filegen loopstats file loopstats type day enable
filegen peerstats file peerstats type day enable
filegen clockstats file clockstats type day enable

# Specify one or more NTP servers.

# Use servers from the NTP Pool Project. Approved by Ubuntu Technical Board
# on 2011-02-08 (LP: #104525). See
http://www.pool.ntp.org/join.html
 for
# more information.
pool 0.ubuntu.pool.ntp.org iburst
pool 1.ubuntu.pool.ntp.org iburst
pool 2.ubuntu.pool.ntp.org iburst
pool 3.ubuntu.pool.ntp.org iburst

# Use Ubuntu's ntp server as a fallback.
pool ntp.ubuntu.com

# Access control configuration; see /usr/share/doc/ntp-doc/html/accopt.html for
# details.  The web page <
http://support.ntp.org/bin/view/Support/AccessRestrictions>

# might also be helpful.
#
# Note that "restrict" applies to both servers and clients, so a configuration
# that might be intended to block requests from certain clients could also end
# up blocking replies from your own upstream servers.

# By default, exchange time with everybody, but don't allow configuration.
restrict -4 default kod notrap nomodify nopeer noquery limited
restrict -6 default kod notrap nomodify nopeer noquery limited

# Local users may interrogate the ntp server more closely.
restrict 127.0.0.1
restrict ::1

# Needed for adding pool entries
restrict source notrap nomodify noquery

# Clients from this (example!) subnet have unlimited access, but only if
# cryptographically authenticated.
#restrict 192.168.123.0 mask 255.255.255.0 notrust


# If you want to provide time to your local subnet, change the next line.
# (Again, the address is an example only.)
#broadcast 192.168.123.255

# If you want to listen to time broadcasts on your local subnet, de-comment the
# next lines.  Please do this only if you trust everybody on the network!
#disable auth
#broadcastclient
해당 부분 주석 처리하여 설정 변경
# restrict -4 default kod notrap nomodify nopeer noquery limited # restrict -6 default kod notrap nomodify nopeer noquery limited
Distributed Reflection Denial of Service (분산 반사 서비스 거부 공격)
특징
출발지 IP를 위조(Source IP Spoofing)
공격자는 IP를 공격 대상으로 Spoofing, 대량의 공격 요청을 반사 대상(서버 등)에 보냄
→ IP를 기반으로 공격을 방어하거나 공격자 역추적이 어려움
다수의 정상 동작 서버에 공격 트래픽 발생시켜, 정상 트래픽과의 구분이 어려움
공격 트래픽이 수백 Gbps 이상의 대규모로 발생하여, 탐지 하더라도 방어하기 어려움
UDP 기반 증폭 공격
DNS
개념
Domain Name System, 호스트와 도메인 이름과 아이피 주소와의 변환을 수행할 수 있도록 만들어진 주소 변환 프로토콜
사용 포트
53/UDP port, CVE-2006-0987
원리
DNS 레코드 값을 서버에 재귀적인 방식으로 질의를 하여 찾을 수 있음 DNS 서버에 dig 명령을 이용해 ANY 타입의 쿼리로 질의를 보냄(취약한 서버 찾기) DNS 서버는 질의를 받은 도메인과 관련된 모든 타입의 레코드 정보를 보내줌(대량의 응답) * dig 명령: DNS 질의응답이 정상적으로 이루어지는지를 확인 점검하는 경우에 주로 사용
기존 DNS 프로토콜: 512byte로 사이즈 제한 확장 버전인 EDNS: 4096byte까지 전송이 가능하여 더 큰 증폭 효과를 만들 수 있음
찾는 방법
DNS 서버에 dig 명령을 이용해 ANY 타입의 쿼리를 보내 취약한 서버 찾음
NTP
개념
Network Time Protocol, 가장 오래된 인터넷 프로토콜, 네트워크를 통해 컴퓨터 간 시간 동기화를 위한 네트워크 프로토콜
사용 포트
123/UDP port, CVE-2013-5211
원리
NTP 프로토콜에 '몬리스트(monlist)'라는 명령어를 보냄 'monlist'라는 명령으로 요청받으면, 최근에 해당 서버에 접속한 최대 600개의 호스트들에 대한 최신 정보를 응답으로 보내줌 기본 monlist 요청은 8byte로 가능, 수백~수천 배의 응답
찾는 방법
nmap 등의 스캐닝 툴
예시
프랑스에서 초당 400Gbps 규모의 DDoS 공격 탐지(2014년 2월 13일) NTP 프로토콜을 이용한 증폭 공격 사례 대량의 정보를 요청하는 명령 전송하여 대량의 응답 받음
해결 방안
NTP 서버가 취약한 버전일 경우 NTP-4.2.7p26 이상 버전으로 업그레이드
SSDP
개념
Simple Service Discovery Protocol, UPnP(Universal Plug and Play) 프로토콜에서 근거리 혹은 인터넷에 연결된 디바이스를 찾는데 사용되는 프로토콜
사용 포트
1900/UDP port
원리
SSDP를 이용해 네트워크 서버나 정적인 호스트 설정 없이 디바이스 탐지가 가능(like DHCP, DNS) M-Search 메서드를 이용하여 멀티캐스트 방식으로 로컬 네트워크에 연결된 디바이스 조회 가능 응답 패킷에는 다양한 정보 포함(e.g. 헤더, 배너정보 OS, UUID 정보) 40byte 정도의 M-Search 요청에 대해 서버는 평균적으로 30배 이상의 크기를 갖는 응답을 보내줌
찾는 방법
UDP 1900번 포트로 SSDP M-Search 패킷으로 인터넷 스캐닝하여 서버 찾음
SNMP
개념
Simple Network Management Protocol, 네트워크 디바이스를 관리하는 목적으로 만들어진 프로토콜, 네트워크 구성/성능/장비/보안관리가 가능 기존: 네트워크 디바이스의 모니터링은 ICMP와 같은 프로토콜을 사용 신규: 네트워크가 복잡해짐에 따라 더 효율적으로 네트워크 디바이스를 관리하기 위함 대량의 트래픽을 유발하는 명령 전송하여 대량의 응답 받음
사용 포트
161/UDP port
원리
장비 관리에 접근제어는 SNMP 패킷의 community 필드의 값으로, 보통 public과 같은 값으로 세팅 GetBulkRequest 명령을 이용 테이블에 있는 객체데이터를 요청하는 GetBulkRequest 명령을 반복적으로 수행 70byte의 GetBulkRequest 요청으로 최대 수만 byte의 응답을 받음
찾는 방법
community 값을 public으로 SNMP 패킷을 생성하여 스캐닝하여 증폭 공격에 이용 가능한 서버 찾음
Chargen
개념
Character Generator Protocol, 클라이언트의 요청에 대해 랜덤한 개수(0-512)의 문자열을 응답으로 보내주는 프로토콜
사용 포트
19/UDP port (네트워크 연결에 대한 디버깅, 대역폭 테스팅 등에 사용)
원리
60byte의 요청 패킷에 대해 랜덤한(74~1472bytes) 크기의 응답을 보내줌 (수백 배 정도의 증폭 효과)
찾는 방법
nmap 등의 스캐닝 툴
Others
NetBios
PC의 이름 등록(name registration)과 resolution을 수행하는 프로토콜의 디버깅을 위한 nbtstat 명령 이용
약 3배 정도의 증폭 효과
QOTD
Quote Of The Day, CharGen 프로토콜과 거의 유사한 형태
17/UDP port
TCP SYN Flooding
공격자가 IP를 목표물로 설정
반사 서버로 Syn 요청
반사 서버는 목표물에게 SYN+ACK 보냄
일정 시간 이후 목표물이 SYN+ANK 재전송(TCP 연결 특성상)
P2P
프로토콜별 증폭 공격이 가능한 이유, 공격 기법
공격자는 보통 네트워크 스캐너를 이용하여 증폭 공격에 이용할 취약 서버 리스트를 확보
(e.g. 디바이스 검색엔진 Shodan 이용)
과정
증폭 공격에 대한 공격 대상이 네트워크에 존재하는 경우
공격에 사용되는 서버가 네트워크에 존재하는 경우
공격자가 네트워크에 존재하는 경우
보안 대책
ISP에서 IP Spoofing 패킷 진입 불가(Ingress Filtering) 설정
네트워크 보안 장비(e.g. 방화벽)에서 동일 IP에 대해 일정 요청 이상은 차단하도록 설정
NTP의 경우 monlist 기능 비활성화(ntpdc -c monlist (NTP server add))
Proactive Attack Prevention
사전에 DRDoS 증폭 공격을 방어하는 방법
1) IP spoofing을 원천적으로 막는 안티스푸핑(Anti spoofing) 기법 적용