AWS Organizations 환경에서 sts:AssumeRoot는 Management Account 또는 Delegated Admin 계정에서 멤버 계정의 Root 수준 임시 세션을 획득하여, 사전 정의된 Task Policy 범위 내에서 특권 작업(Privileged Action)을 수행할 수 있는 기능입니다.
이를 통해 멤버 계정별로 Root 자격증명(비밀번호, 액세스 키, MFA)을 개별 관리하지 않고도, 중앙에서 Root 수준의 긴급 조치를 수행할 수 있습니다.
2. AssumeRoot가 필요한 케이스
2.1 S3 버킷 정책 잠금 해제
항목
내용
상황
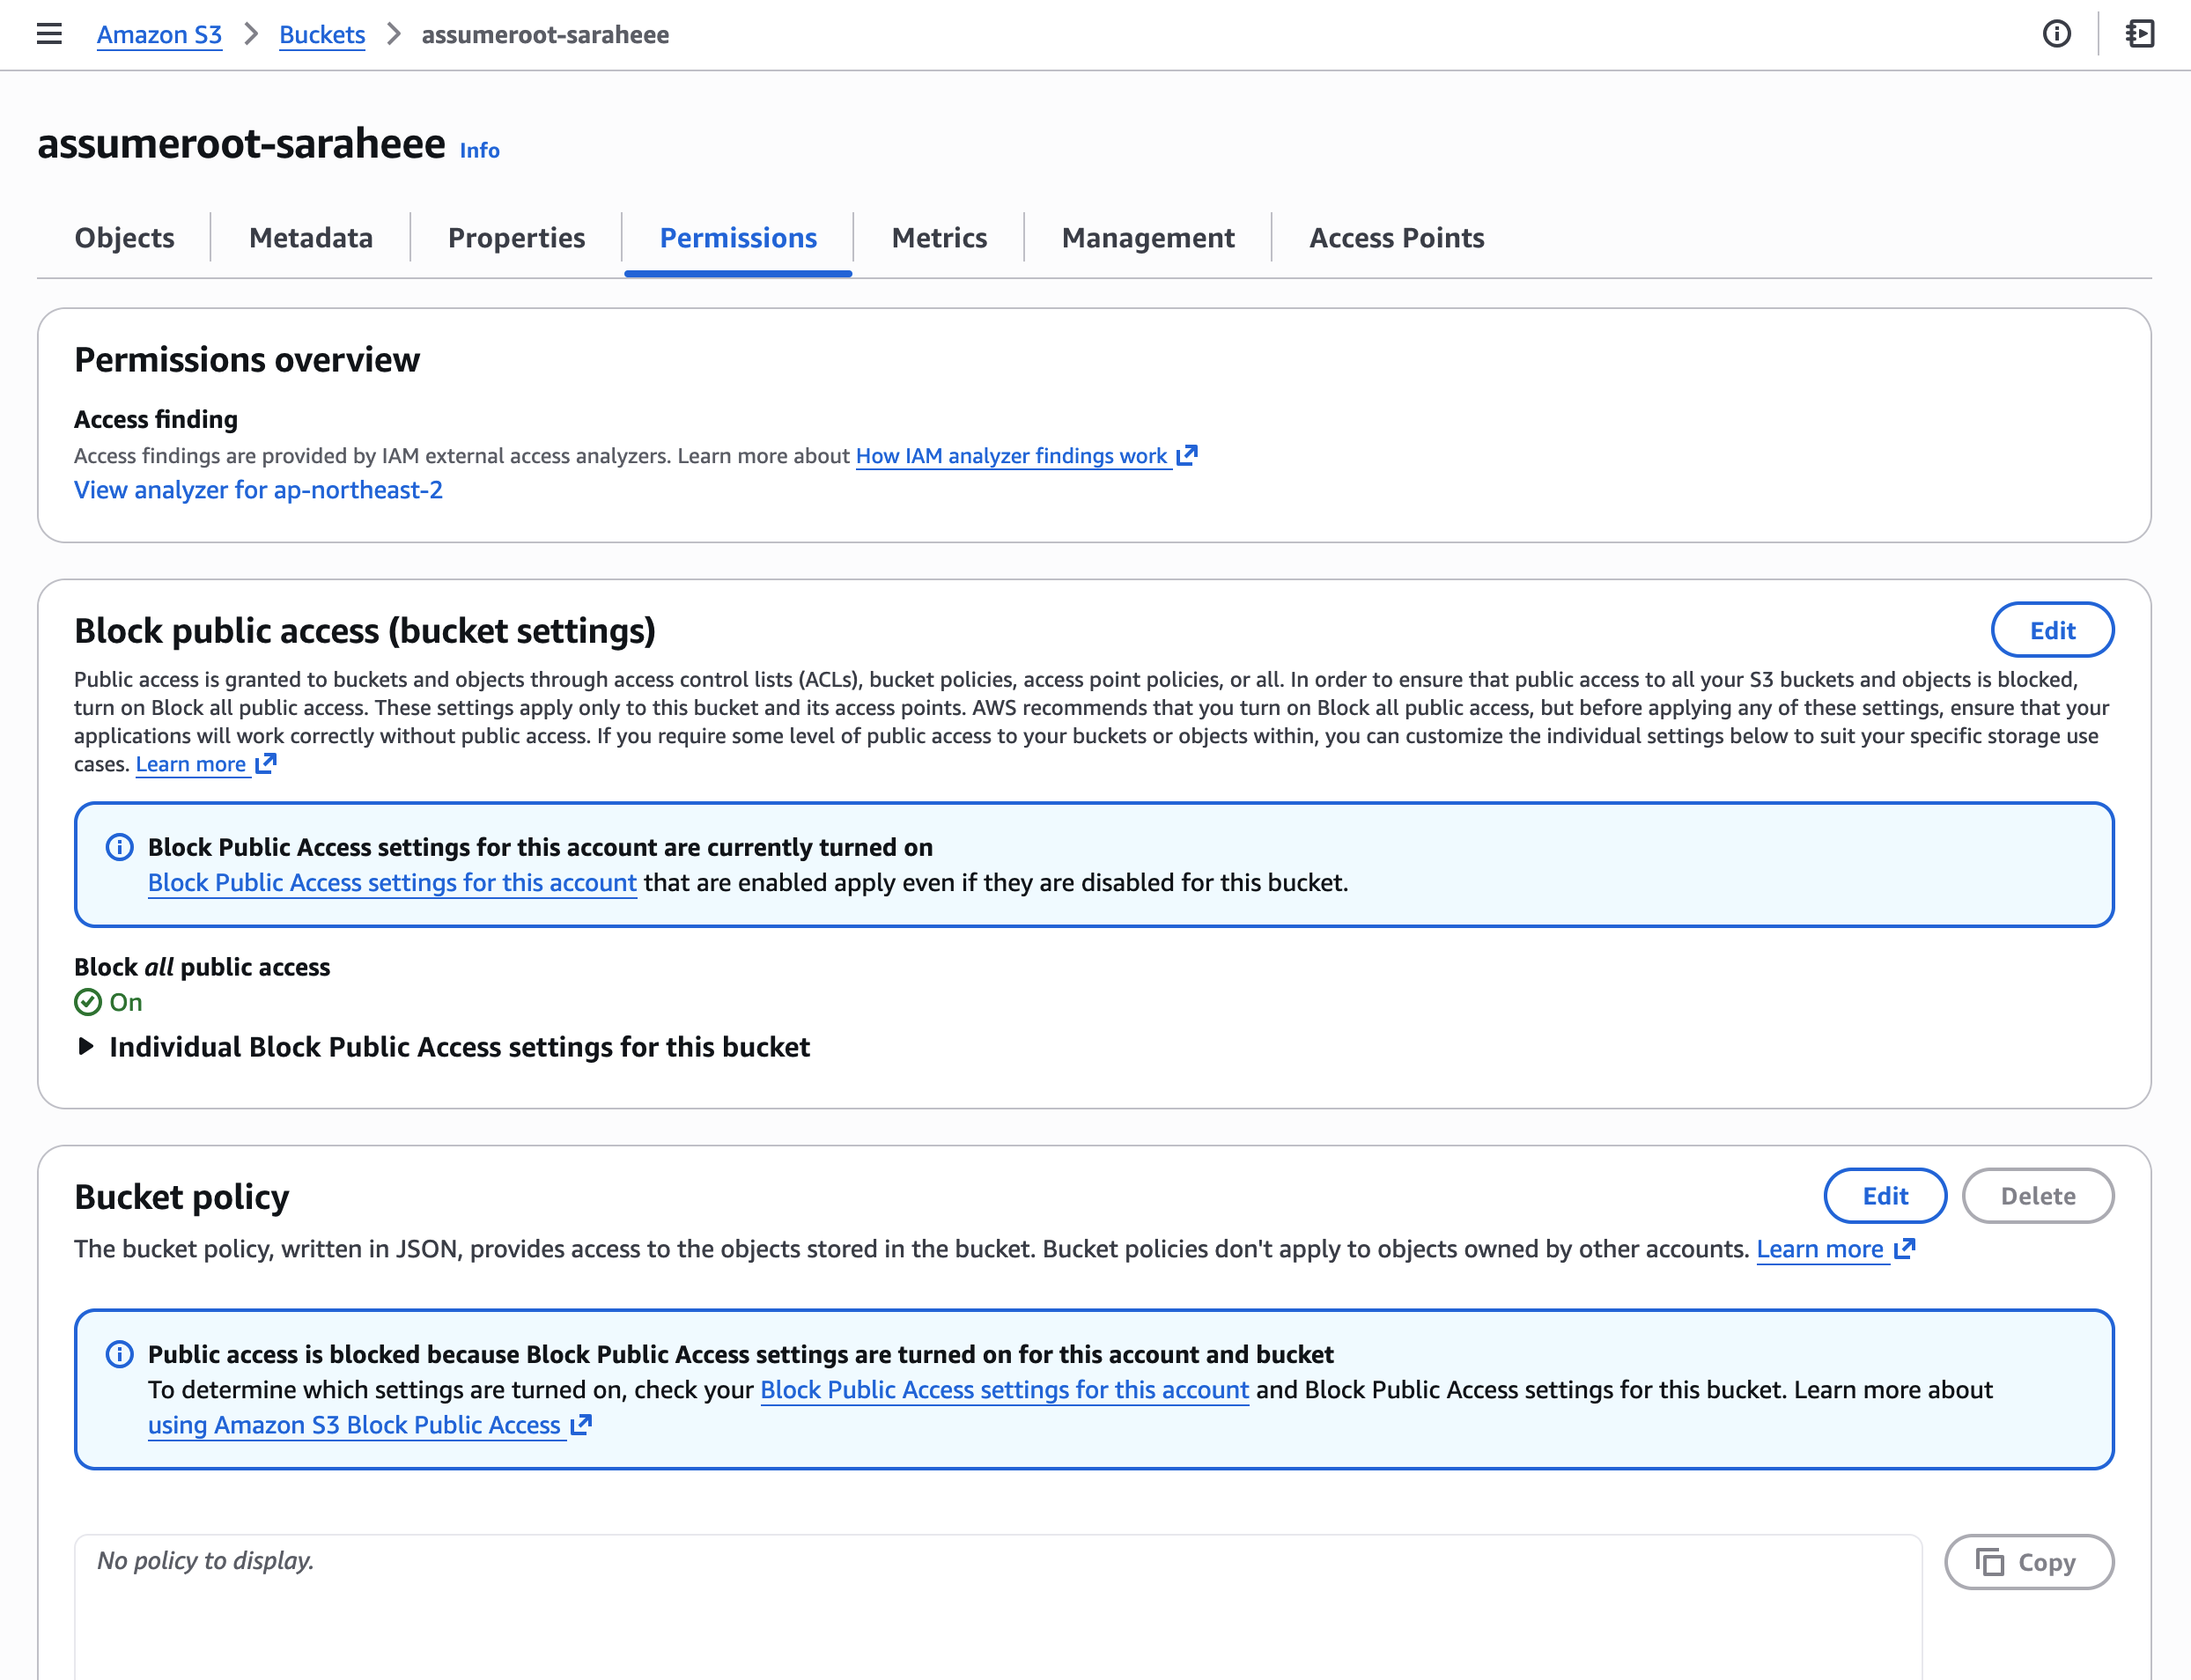
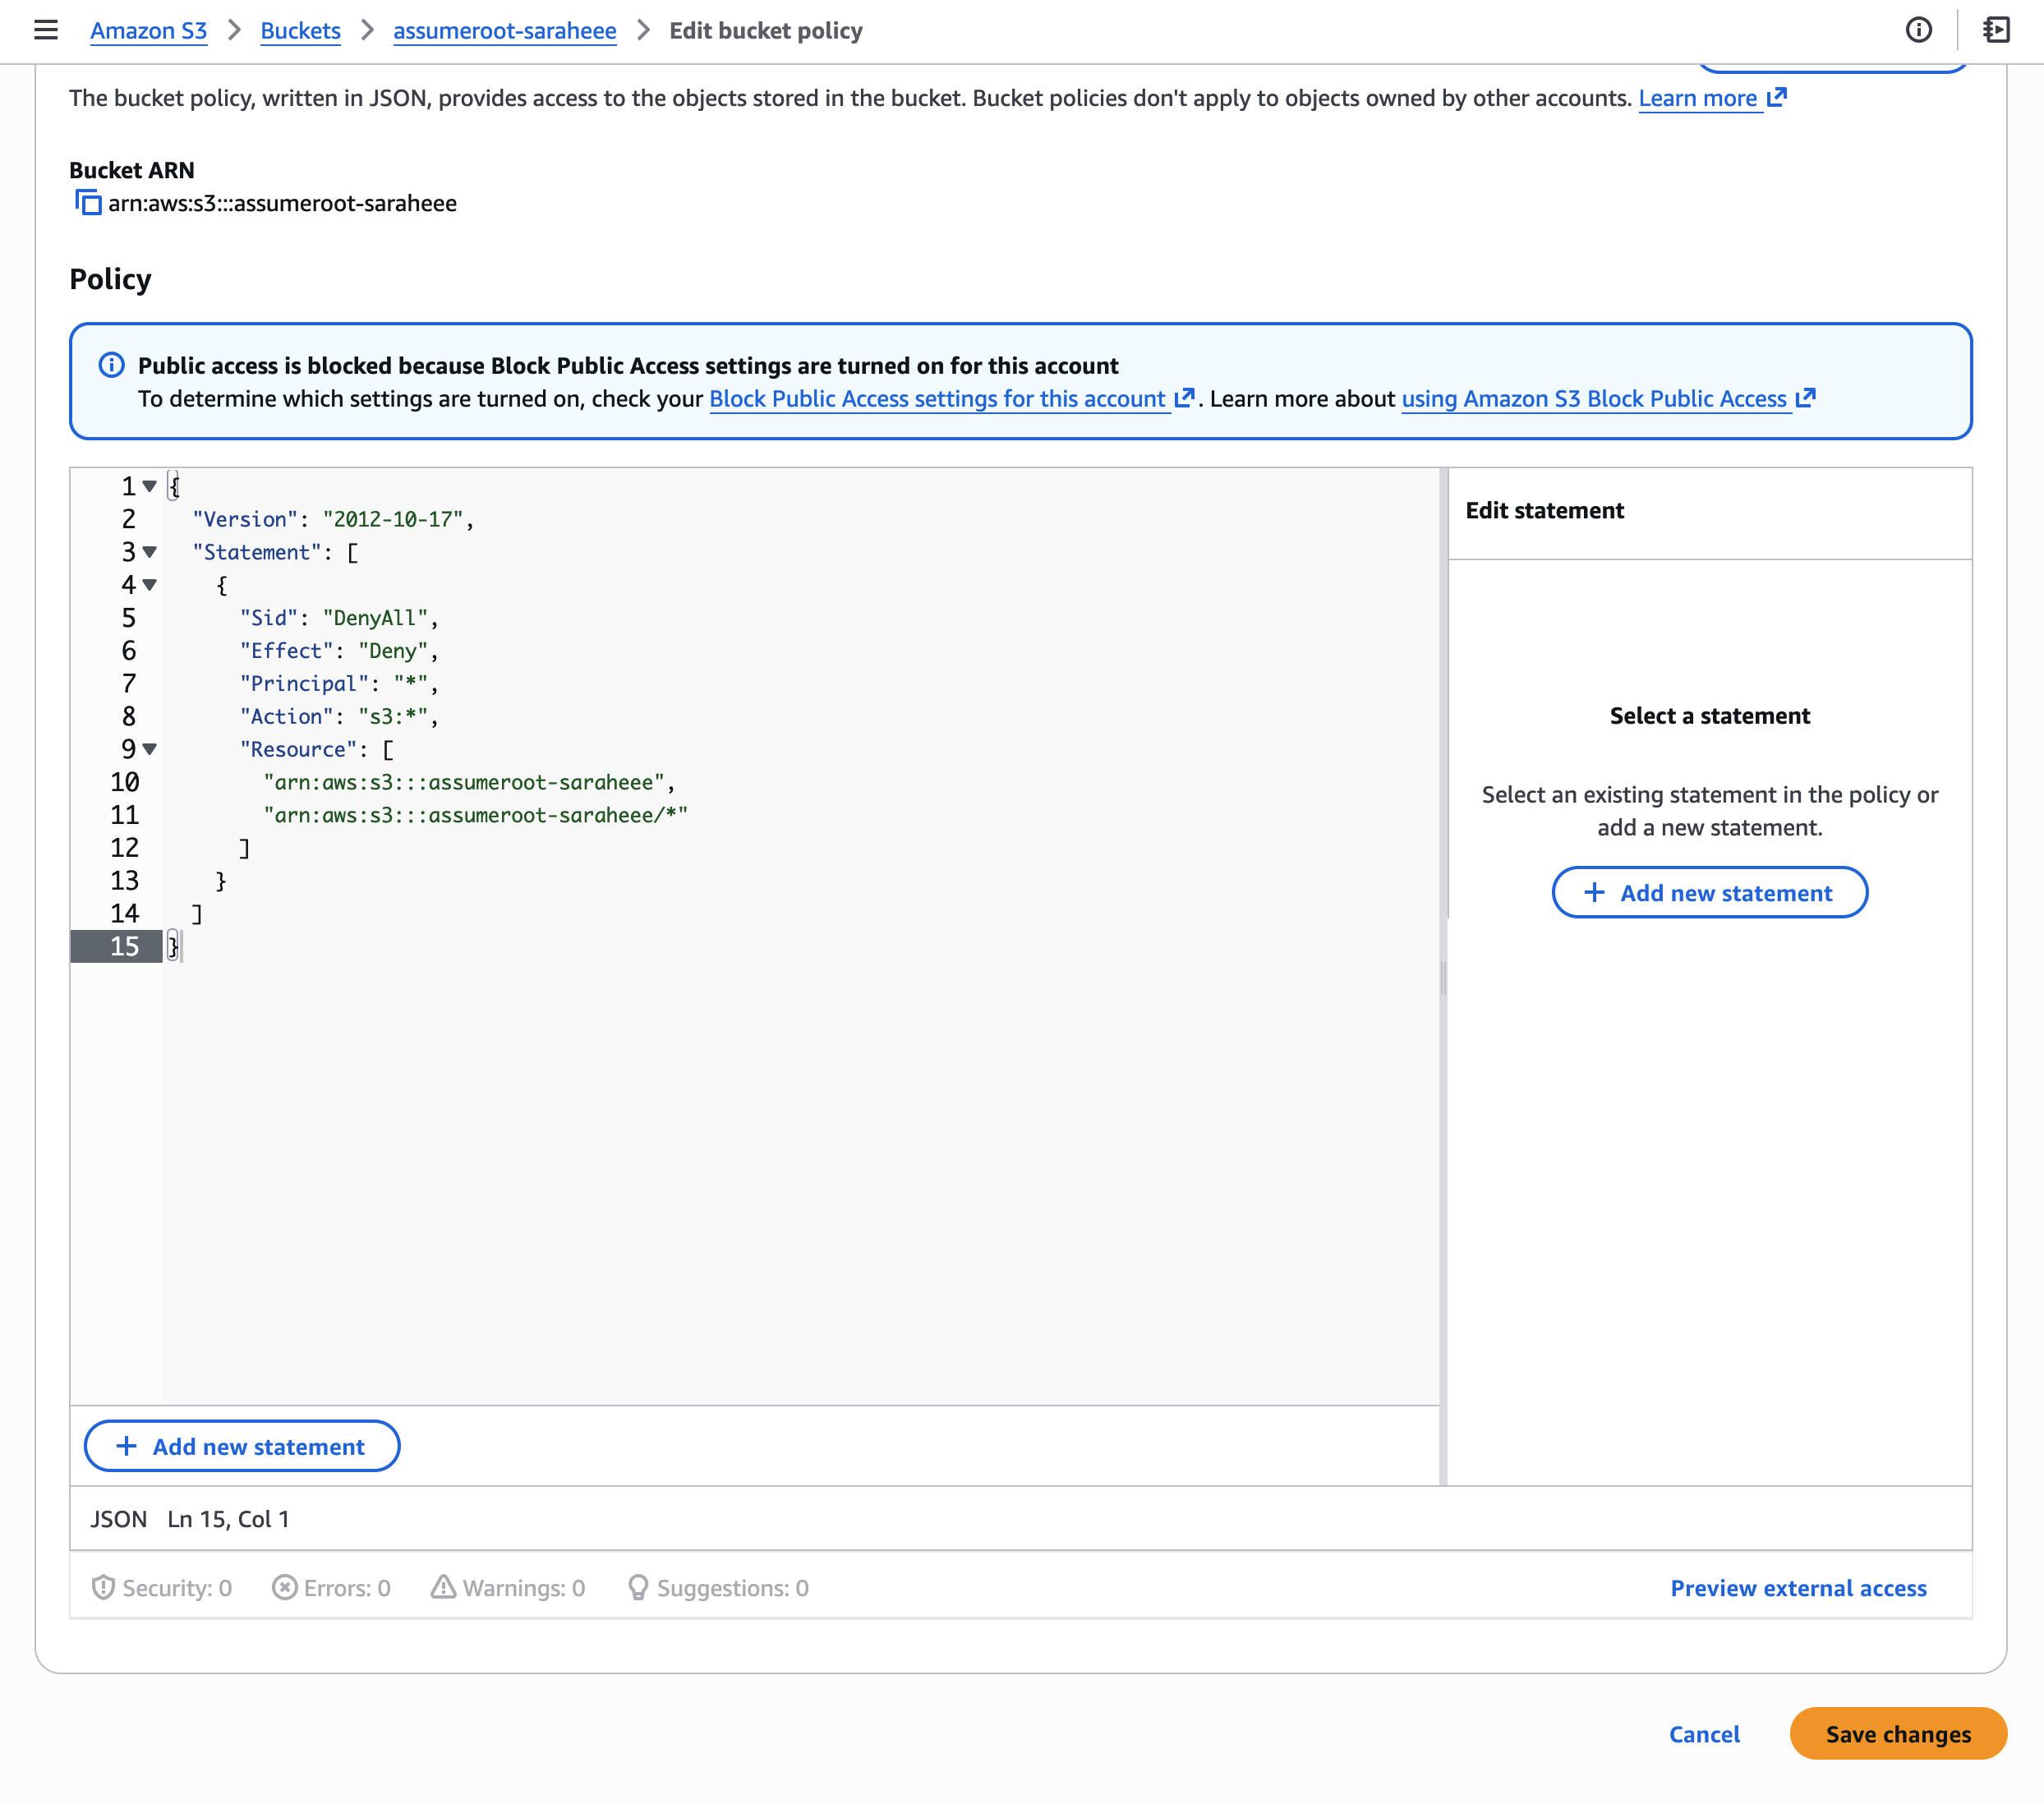
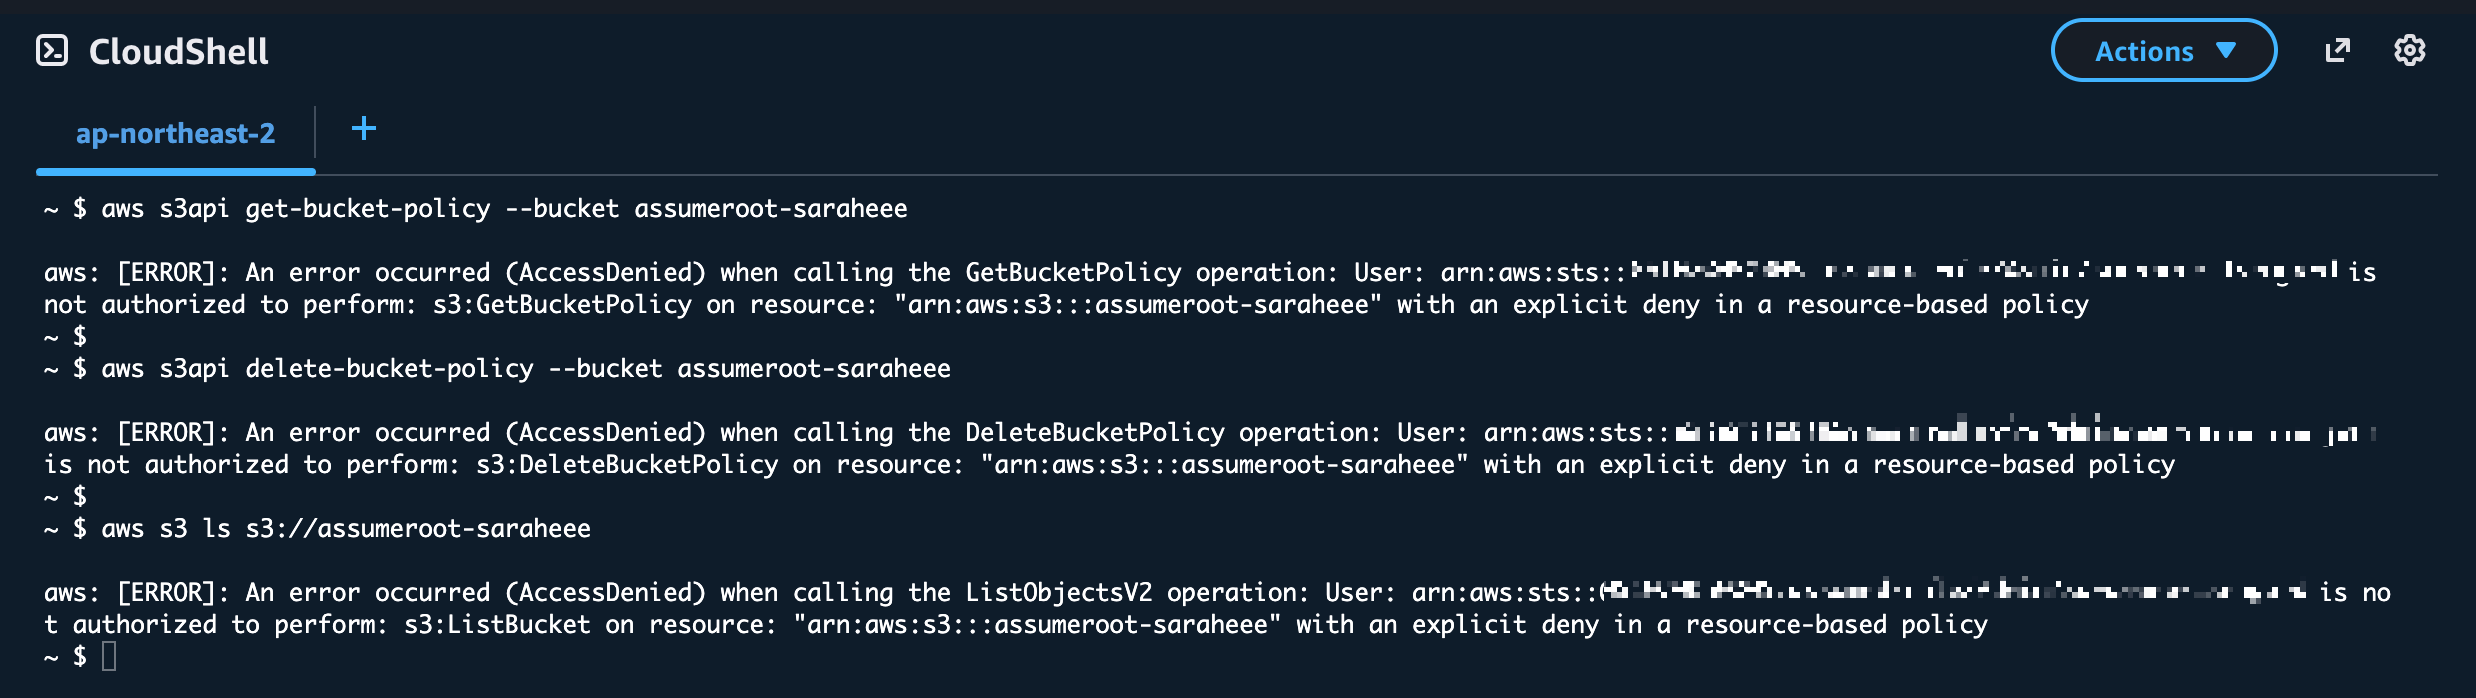
잘못된 S3 버킷 정책 적용으로 모든 Principal의 접근이 차단됨 (본인 포함 Deny)
증상
버킷 소유자 포함 어떤 IAM 자격증명으로도 버킷 정책 수정/삭제 불가
Task Policy
S3UnlockBucketPolicy
수행 작업
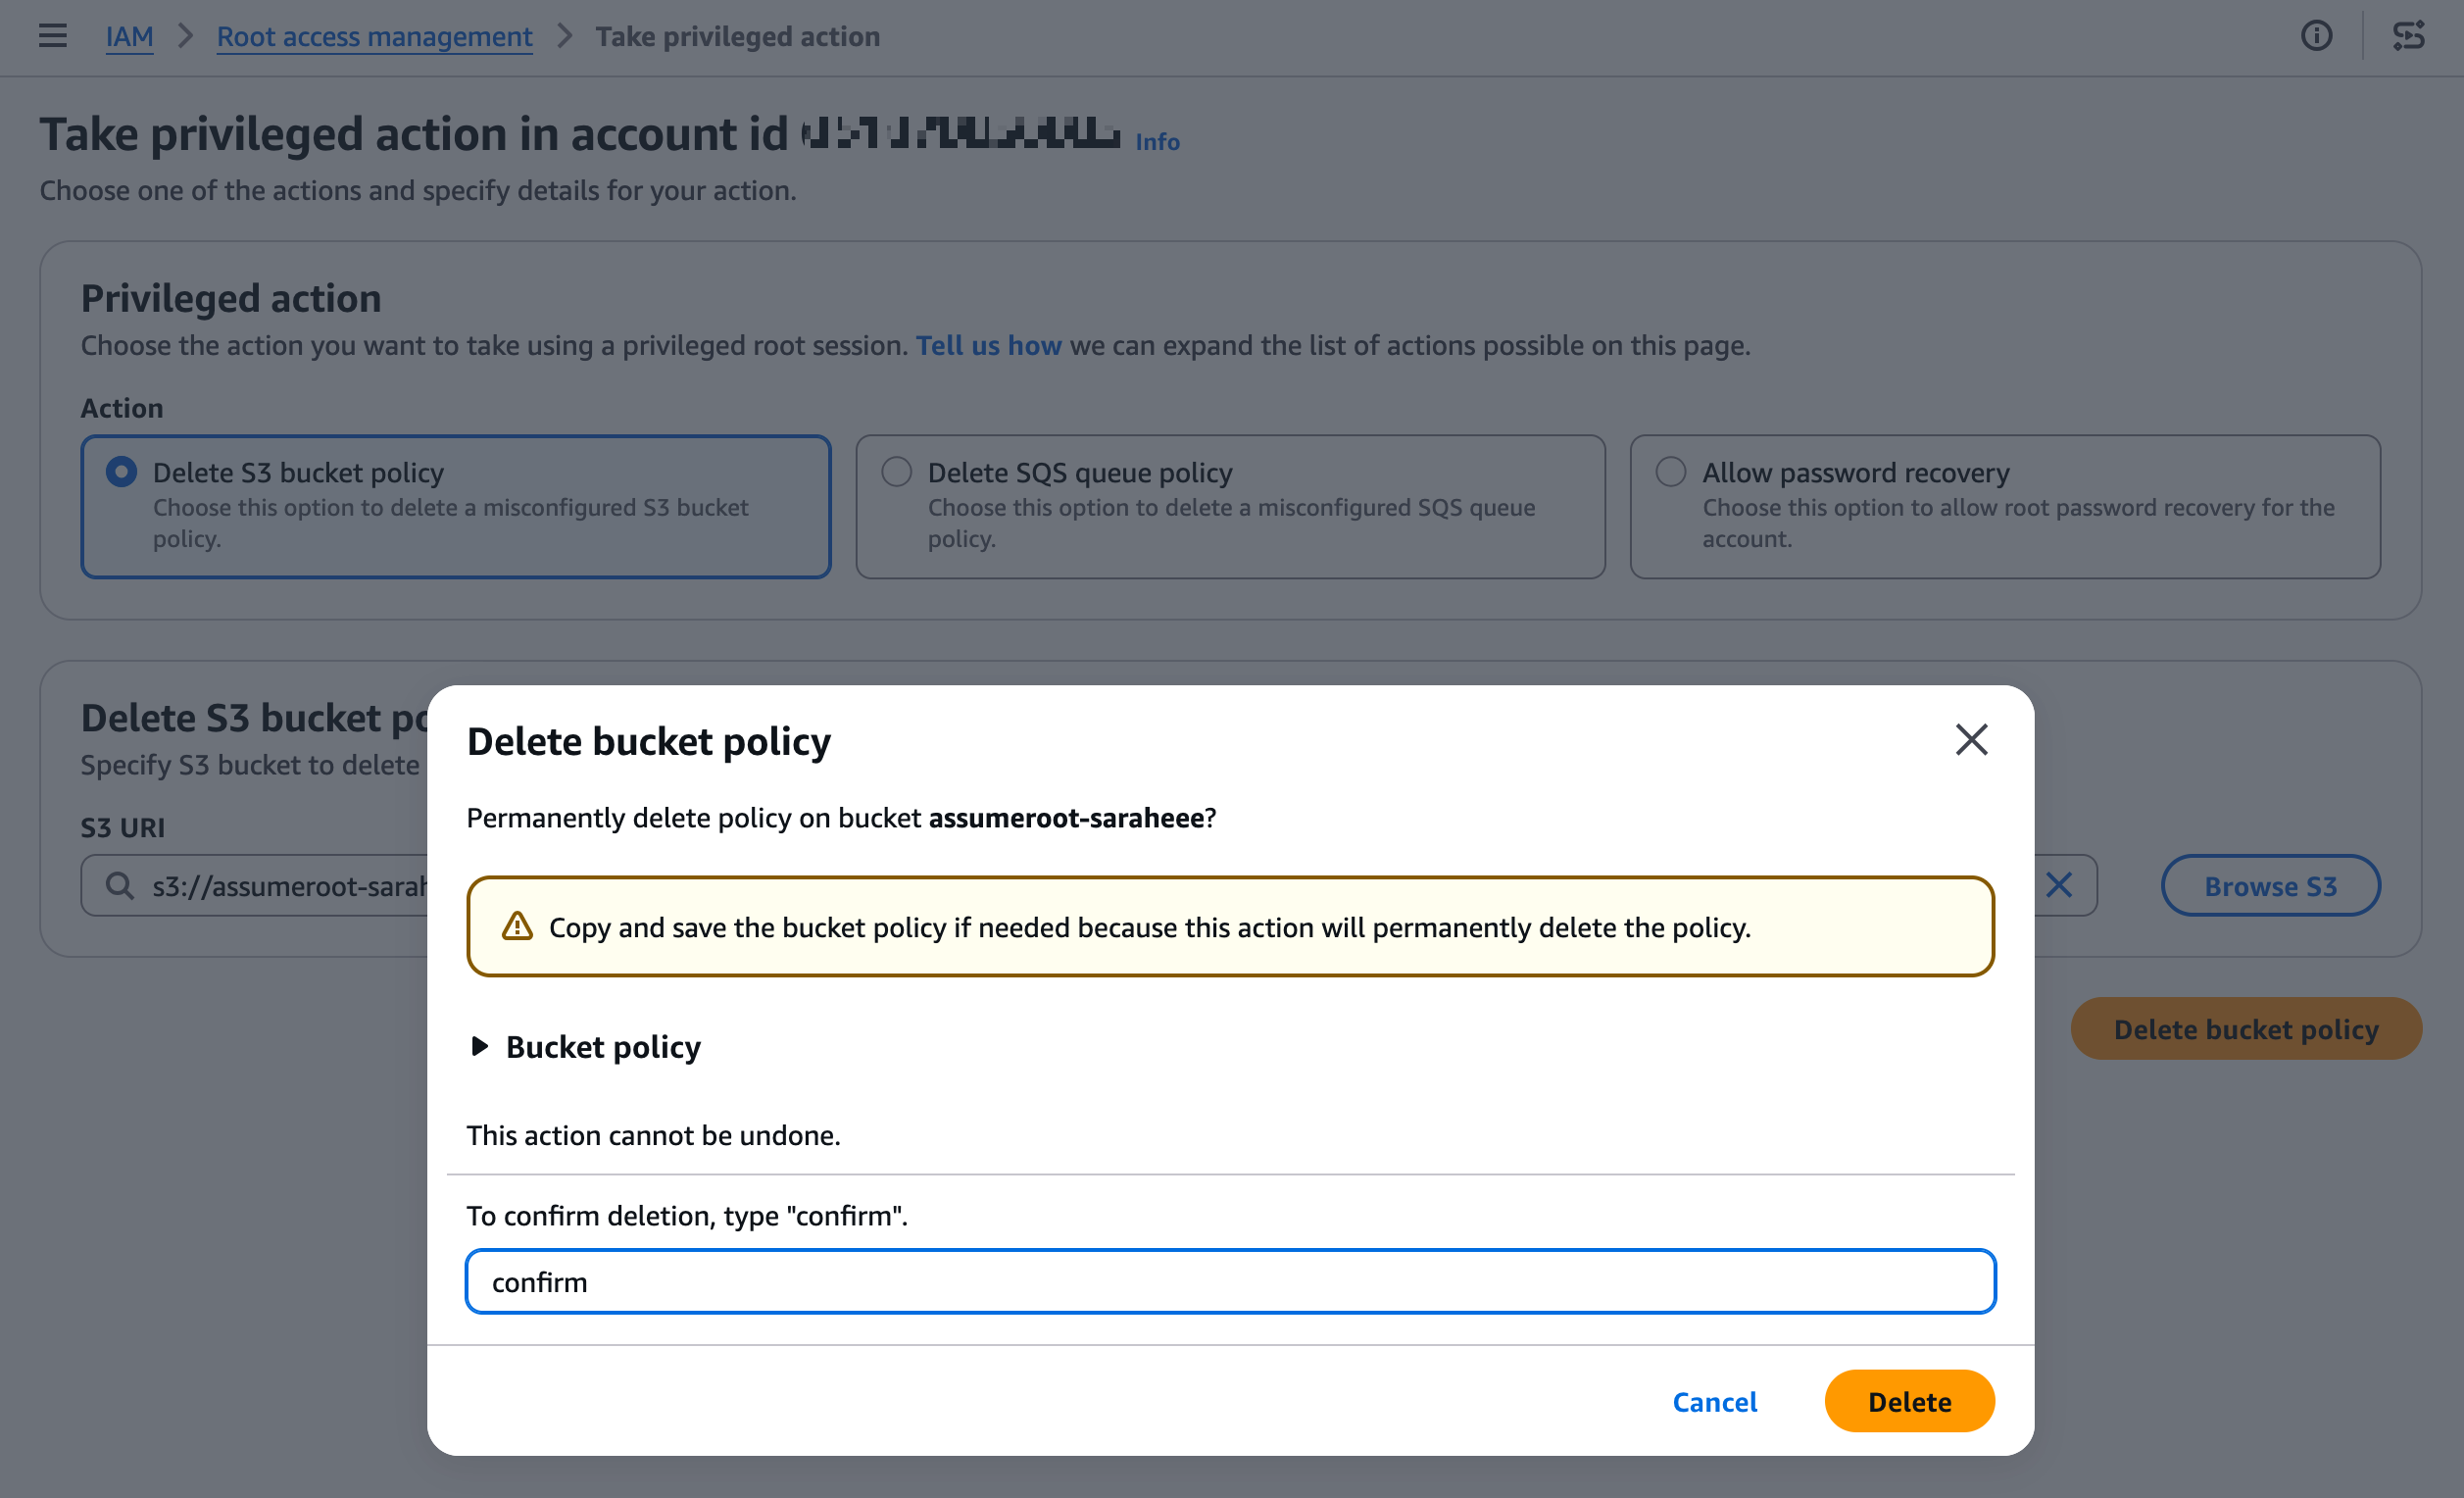
잠긴 S3 버킷 정책 삭제
예시 시나리오: 버킷 정책에 "Effect": "Deny", "Principal": "*" 를 잘못 적용하여, 관리자 포함 전체 접근이 차단된 경우. 일반 IAM 권한으로는 해당 정책을 수정할 수 없으며, Root 세션으로만 정책 삭제 가능
2.2 SQS 큐 정책 잠금 해제
항목
내용
상황
잘못된 SQS 큐 리소스 정책 적용으로 큐 접근 및 정책 수정 불가
증상
메시지 송수신 및 큐 정책 변경 불가로 서비스 중단
Task Policy
SQSUnlockQueuePolicy
수행 작업
잠긴 SQS 큐 리소스 정책 삭제
예시 시나리오: SQS 큐 정책에서 모든 Principal에 대해 Deny를 적용하여, 연동된 Lambda/EC2 등 워크로드가 메시지를 처리하지 못하고 서비스 장애가 발생한 경우
2.3 멤버 계정 Root 자격증명 삭제
항목
내용
상황
멤버 계정의 Root 자격증명(비밀번호, 액세스 키, MFA)이 유출되었거나, 보안 정책상 Root 자격증명을 제거해야 하는 경우
증상
멤버 계정 Root 로그인 가능 상태가 보안 위험으로 식별됨
Task Policy
IAMDeleteRootUserCredentials
수행 작업
멤버 계정의 Root 콘솔 비밀번호, 액세스 키, 서명 인증서, MFA 디바이스 삭제
예시 시나리오: Organizations 환경에서 멤버 계정의 Root 자격증명을 중앙에서 일괄 제거하여, Root 직접 로그인을 원천 차단하고 중앙 집중식 루트 액세스만 허용하는 경우
2.4 멤버 계정 Root 비밀번호 복구
항목
내용
상황
멤버 계정에 Root로 직접 로그인이 필요하나, 비밀번호가 설정되어 있지 않거나 분실된 경우
증상
Root 이메일을 통한 비밀번호 재설정이 불가하거나 시간이 오래 소요됨
Task Policy
IAMCreateRootUserPassword
수행 작업
멤버 계정의 Root 로그인 프로필(비밀번호) 생성
예시 시나리오: 특정 멤버 계정에서 Root 수준의 콘솔 접근이 필요하나(예: 특정 서비스의 Root-only 설정 변경), Root 비밀번호가 설정되어 있지 않은 경우 임시로 비밀번호를 생성하여 접근
2.5 Root 자격증명 현황 감사
항목
내용
상황
멤버 계정의 Root 자격증명 상태(비밀번호 존재 여부, 액세스 키 활성 여부, MFA 등록 여부)를 중앙에서 확인해야 하는 경우
증상
보안 감사 또는 컴플라이언스 점검 시 각 계정별 Root 자격증명 현황 파악 필요
Task Policy
IAMAuditRootUserCredentials
수행 작업
멤버 계정의 Root 자격증명 현황 조회
예시 시나리오: 분기별 보안 감사에서 전체 멤버 계정의 Root 자격증명이 제거되었는지 일괄 확인. 자격증명이 남아있는 계정에 대해 IAMDeleteRootUserCredentials로 후속 조치
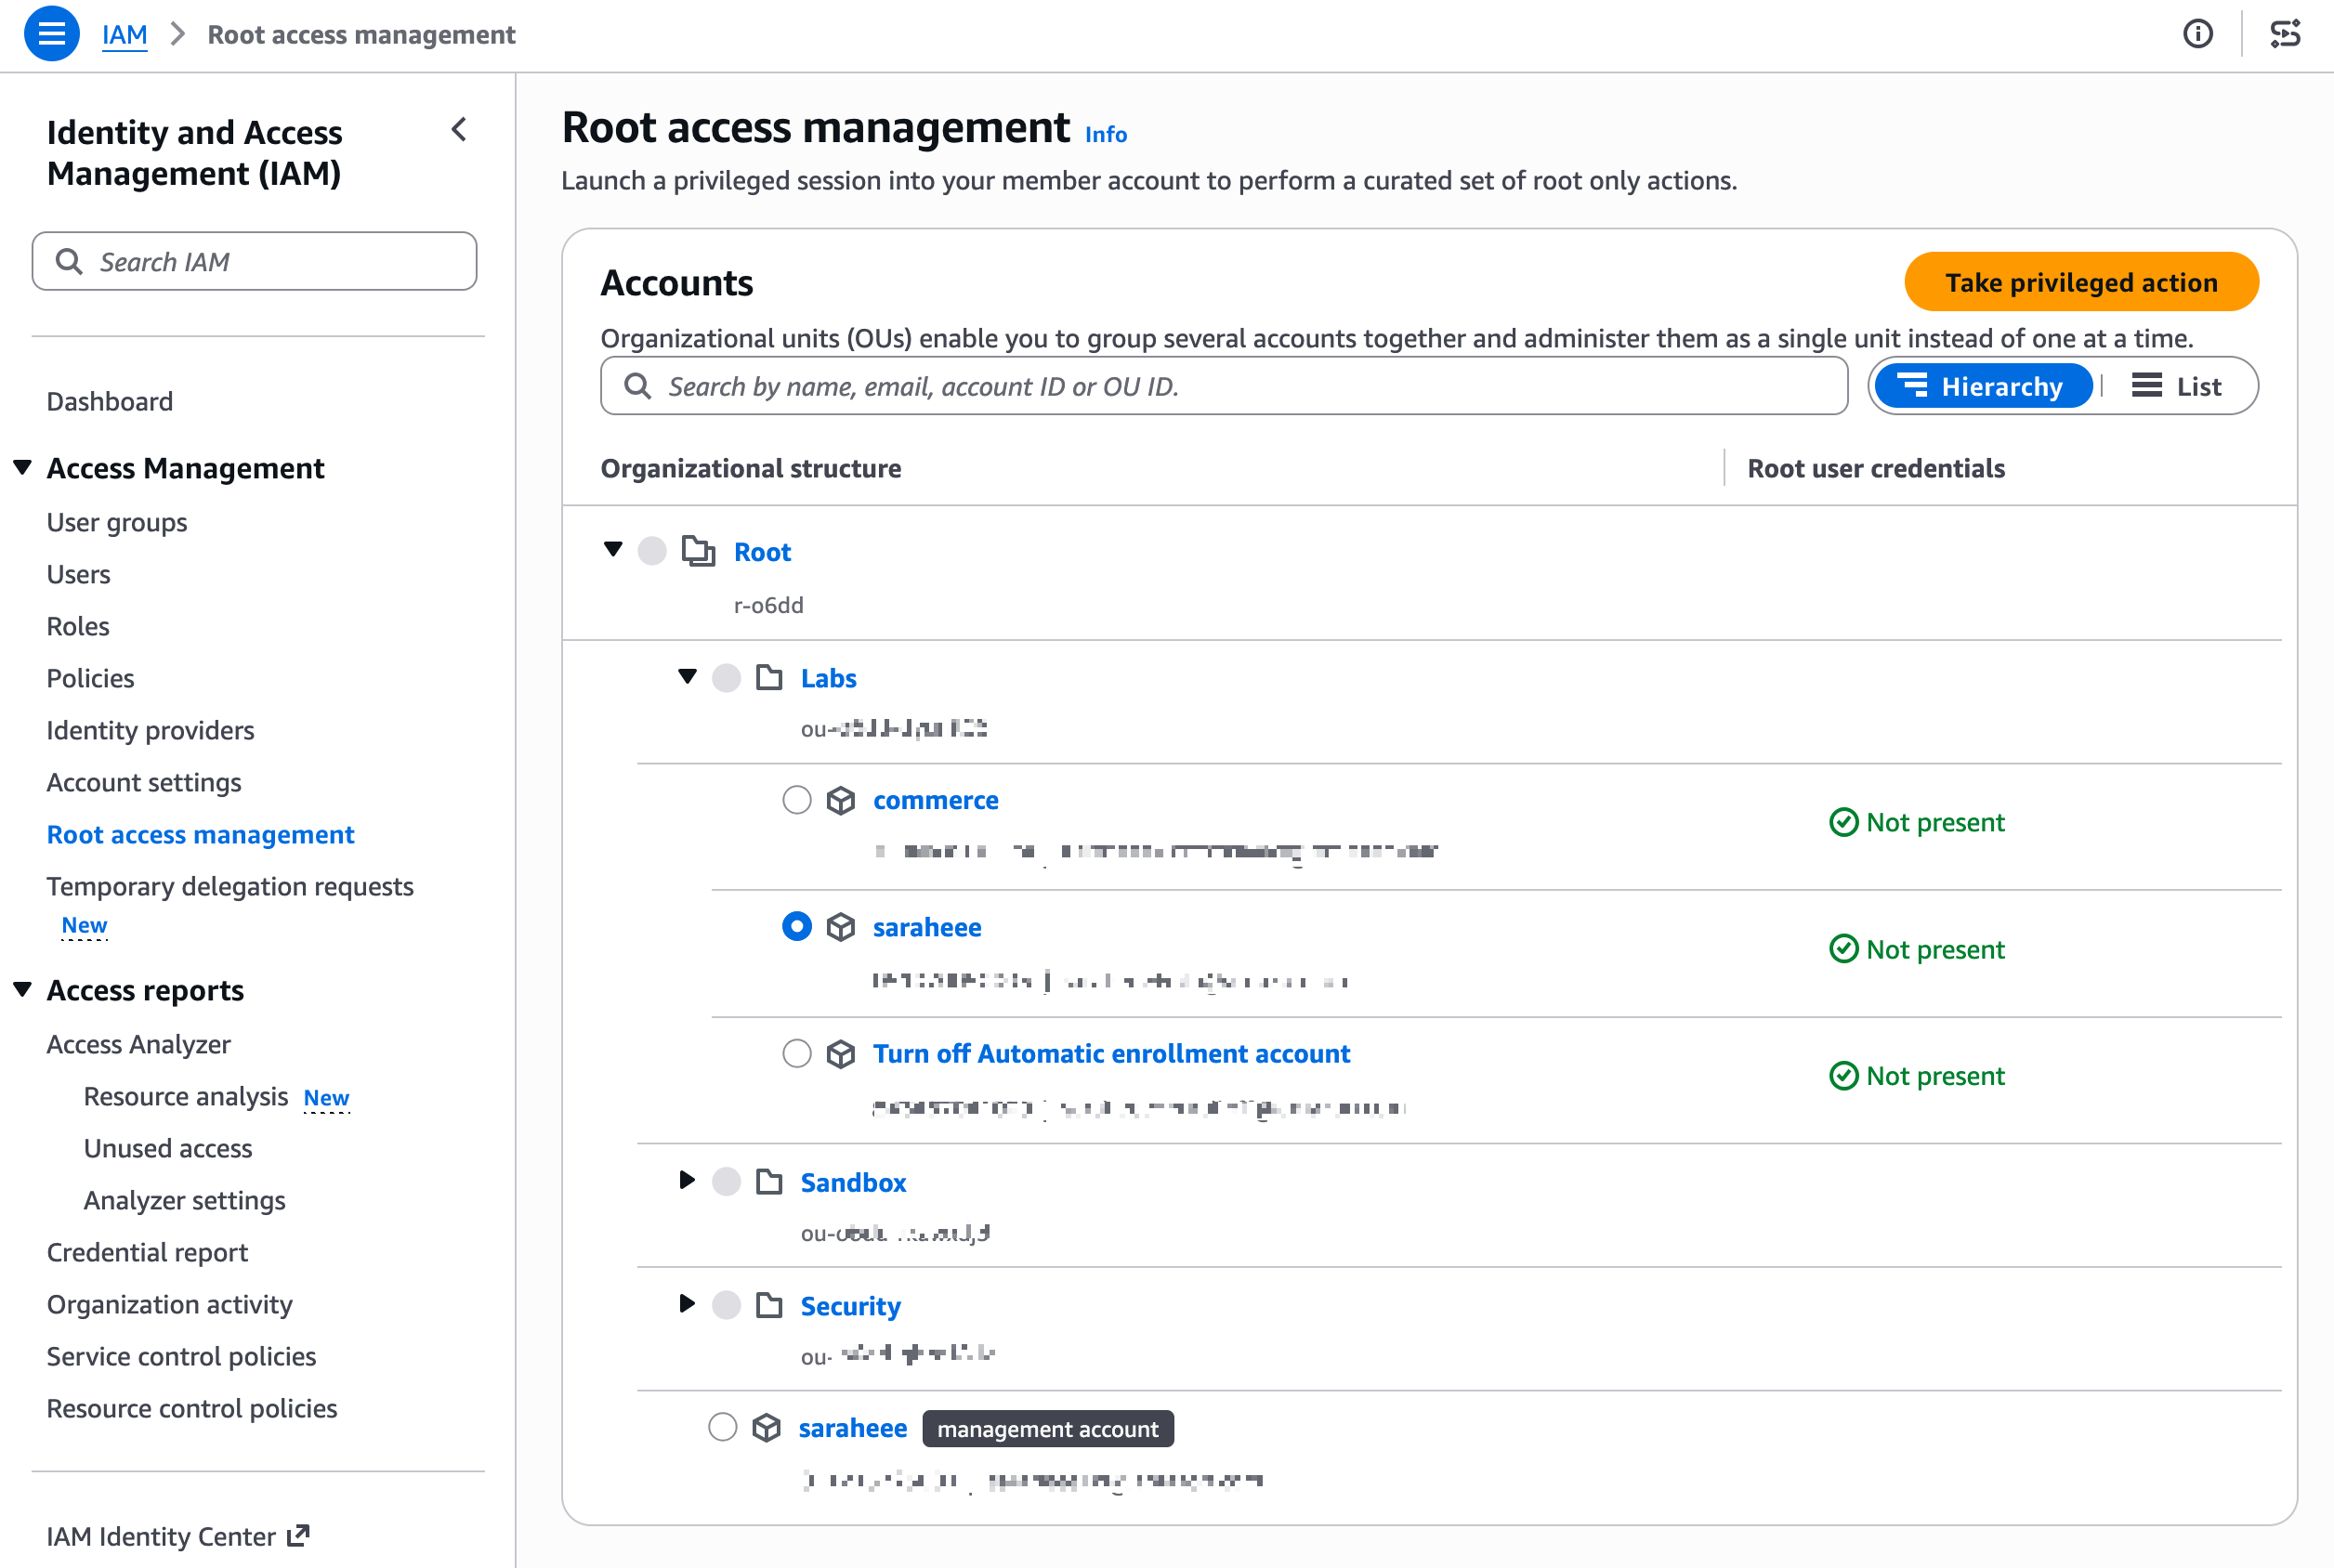
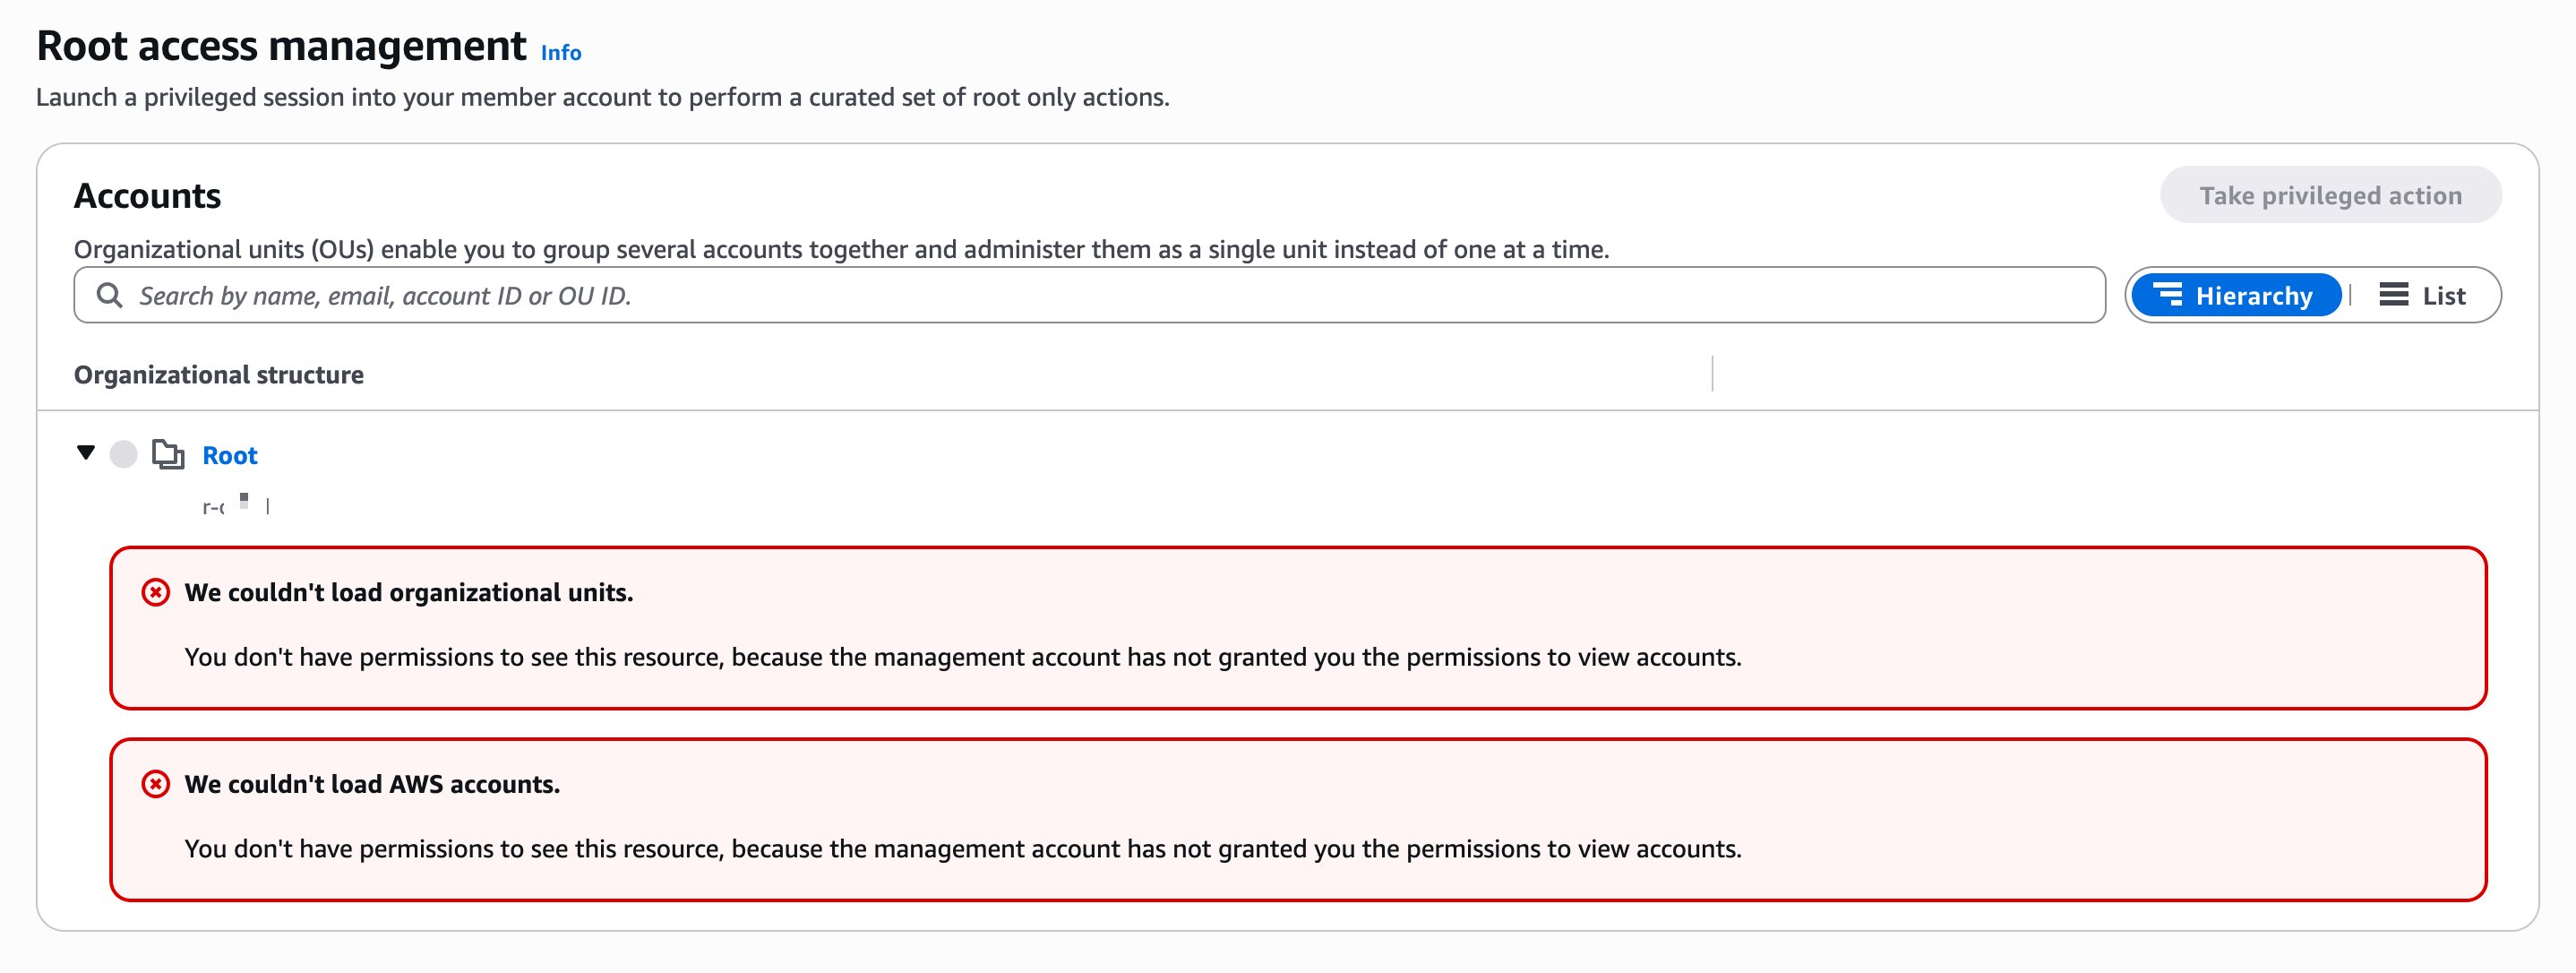
AllowListAccounts Statement는 콘솔에서 Root access management 화면의 조직 구조 조회 및 Take privileged action 대상 계정을 확인하기 위해 필요합니다. 이 권한이 없으면 콘솔에서 계정 목록 및 OU 구조를 로드할 수 없습니다.
Step 3. Specify permission set details
Permission set name: BreakGlassAssumeRoot
Description: Break Glass - sts:AssumeRoot for emergency privileged access
Session duration: 1 hour (최소한으로 설정)
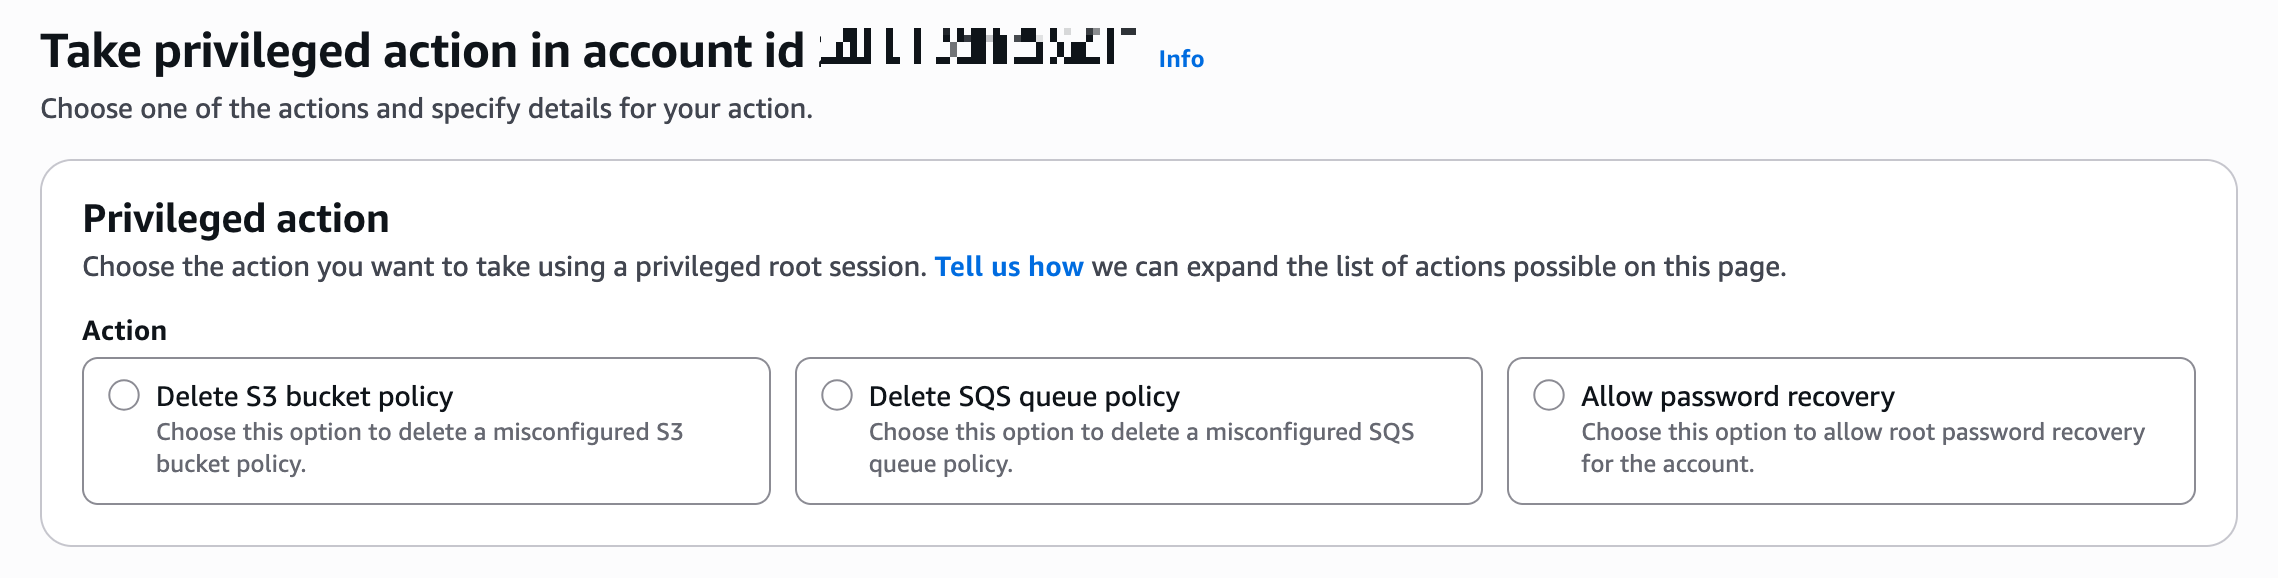
3.3.2 Take privileged action 권한 추가 할당
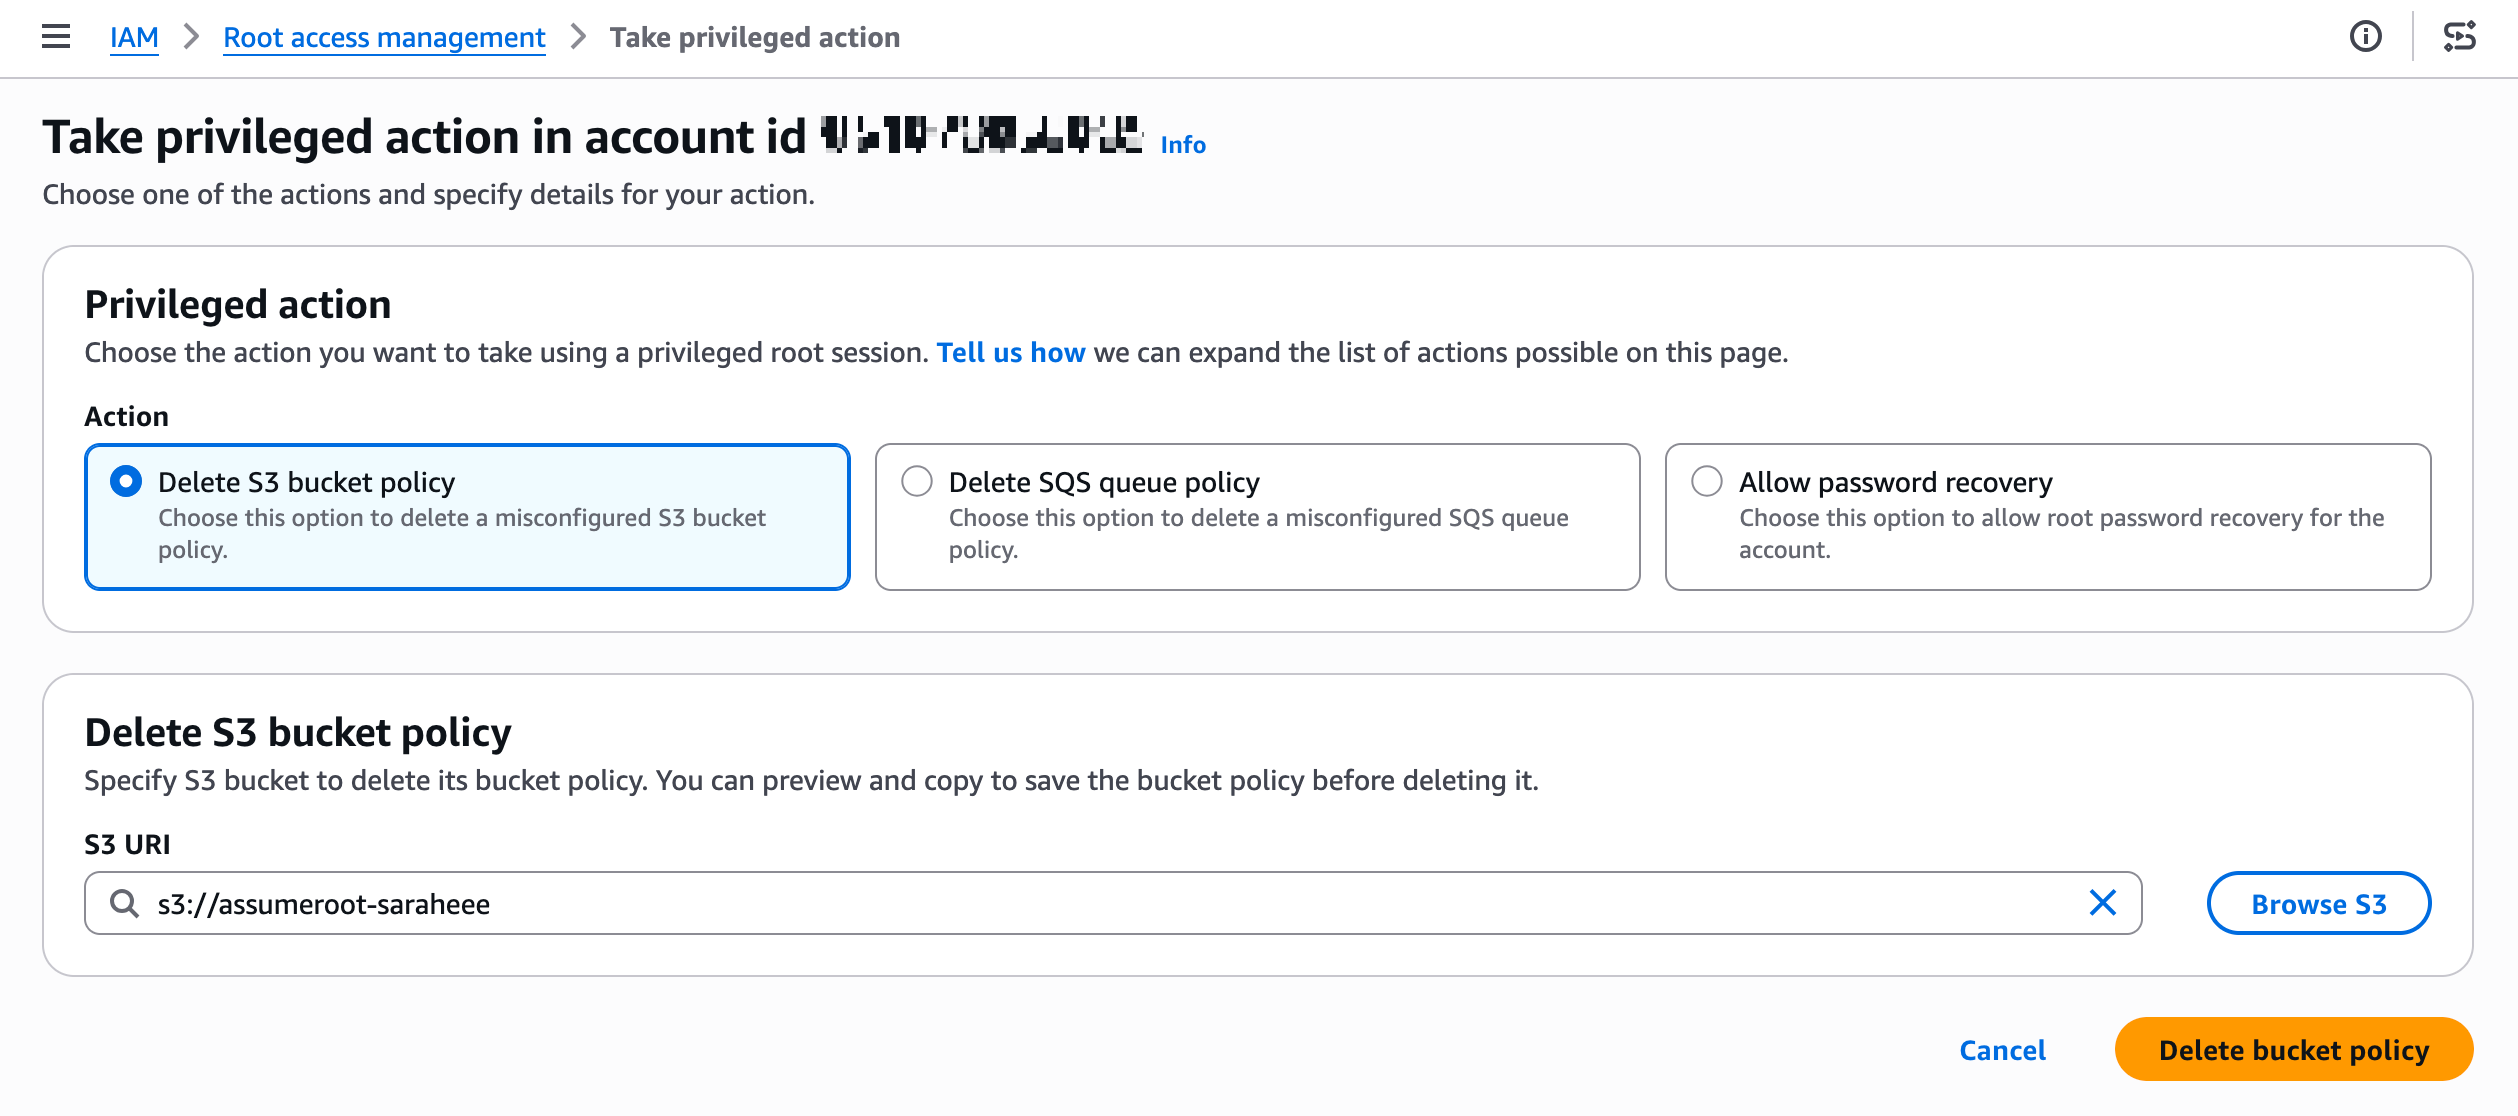
Delete S3 bucket policy
Delete SQS queue policy
Allow password recovery
임시 루트 세션의 범위를 지정할 수 있습니다.
policy/root-task/IAMDeleteRootUserCredentials 루트 세션은 멤버 루트 자격 증명(콘솔 암호, 액세스 키, 서명 인증서 및 MFA 장치)을 삭제할 수 있도록 범위가 제한됩니다.
policy/root-task/IAMCreateRootUserPassword 루트 세션은 멤버 루트 로그인 프로필 생성을 허용하도록 범위가 지정됩니다.
policy/root-task/IAMAuditRootUserCredentials 루트 세션은 루트 자격 증명을 검토하도록 범위가 지정됩니다.
policy/root-task/S3UnlockBucketPolicy 루트 세션은 S3 버킷 정책을 삭제할 수 있도록 범위가 지정됩니다.
policy/root-task/SQSUnlockQueuePolicy 루트 세션은 SQS 큐 리소스 정책을 삭제할 수 있도록 범위가 지정됩니다.
3.3.3 Permission Set 계정 할당
생성한 Permission Set을 대상 계정(Management Account 또는 Delegated Admin 계정)에 할당합니다.
경로: IAM Identity Center → AWS accounts → 대상 계정 선택 → Assign users or groups
단계
내용
Step 1. Users and groups
Break Glass 담당자 사용자 또는 그룹 선택
Step 2. Permission sets
BreakGlassAssumeRoot 선택
Step 3. Review and submit
확인 후 Submit
Step 1 - Users and groups: Break Glass 담당자 사용자 또는 그룹 선택
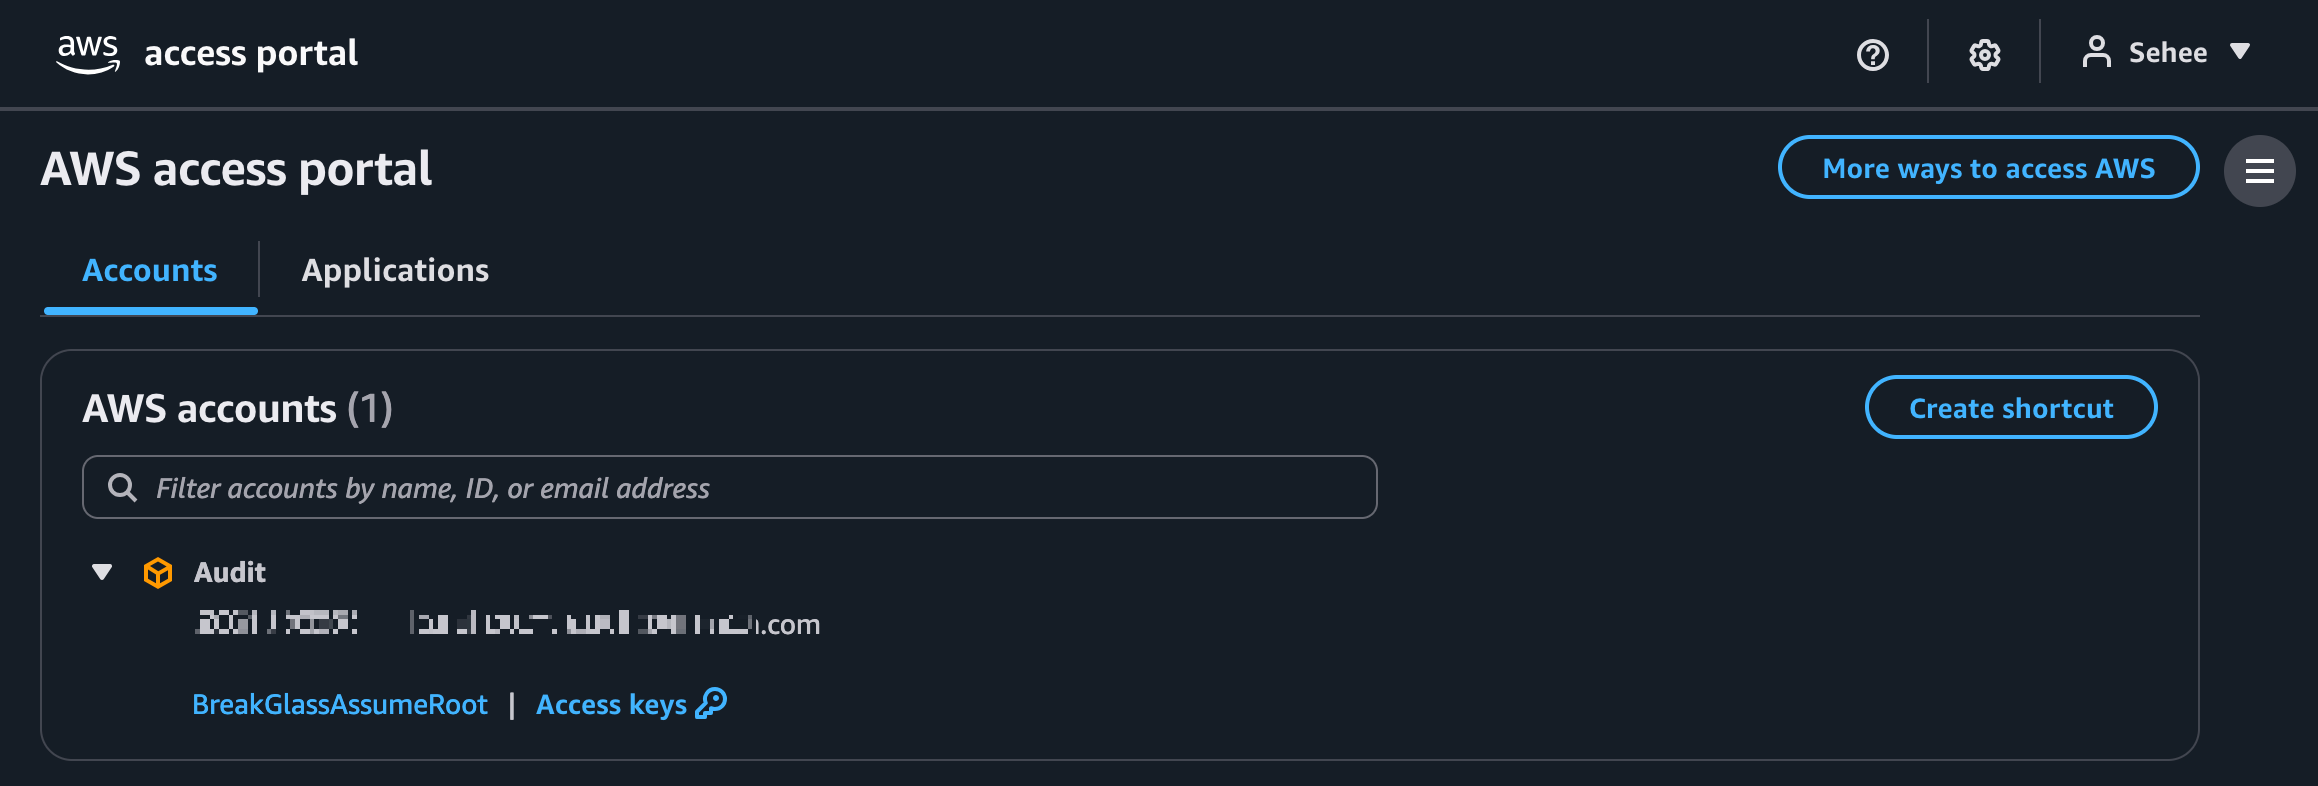
Audit 계정에 로그인하는 IAM Identity Center 사용자/그룹이 실제로 sts:AssumeRoot API를 호출할 수 있도록 IAM 권한을 부여하는 것 (Audit 계정에 로그인하는 사람에게 AssumeRoot 실행 권한 부여)
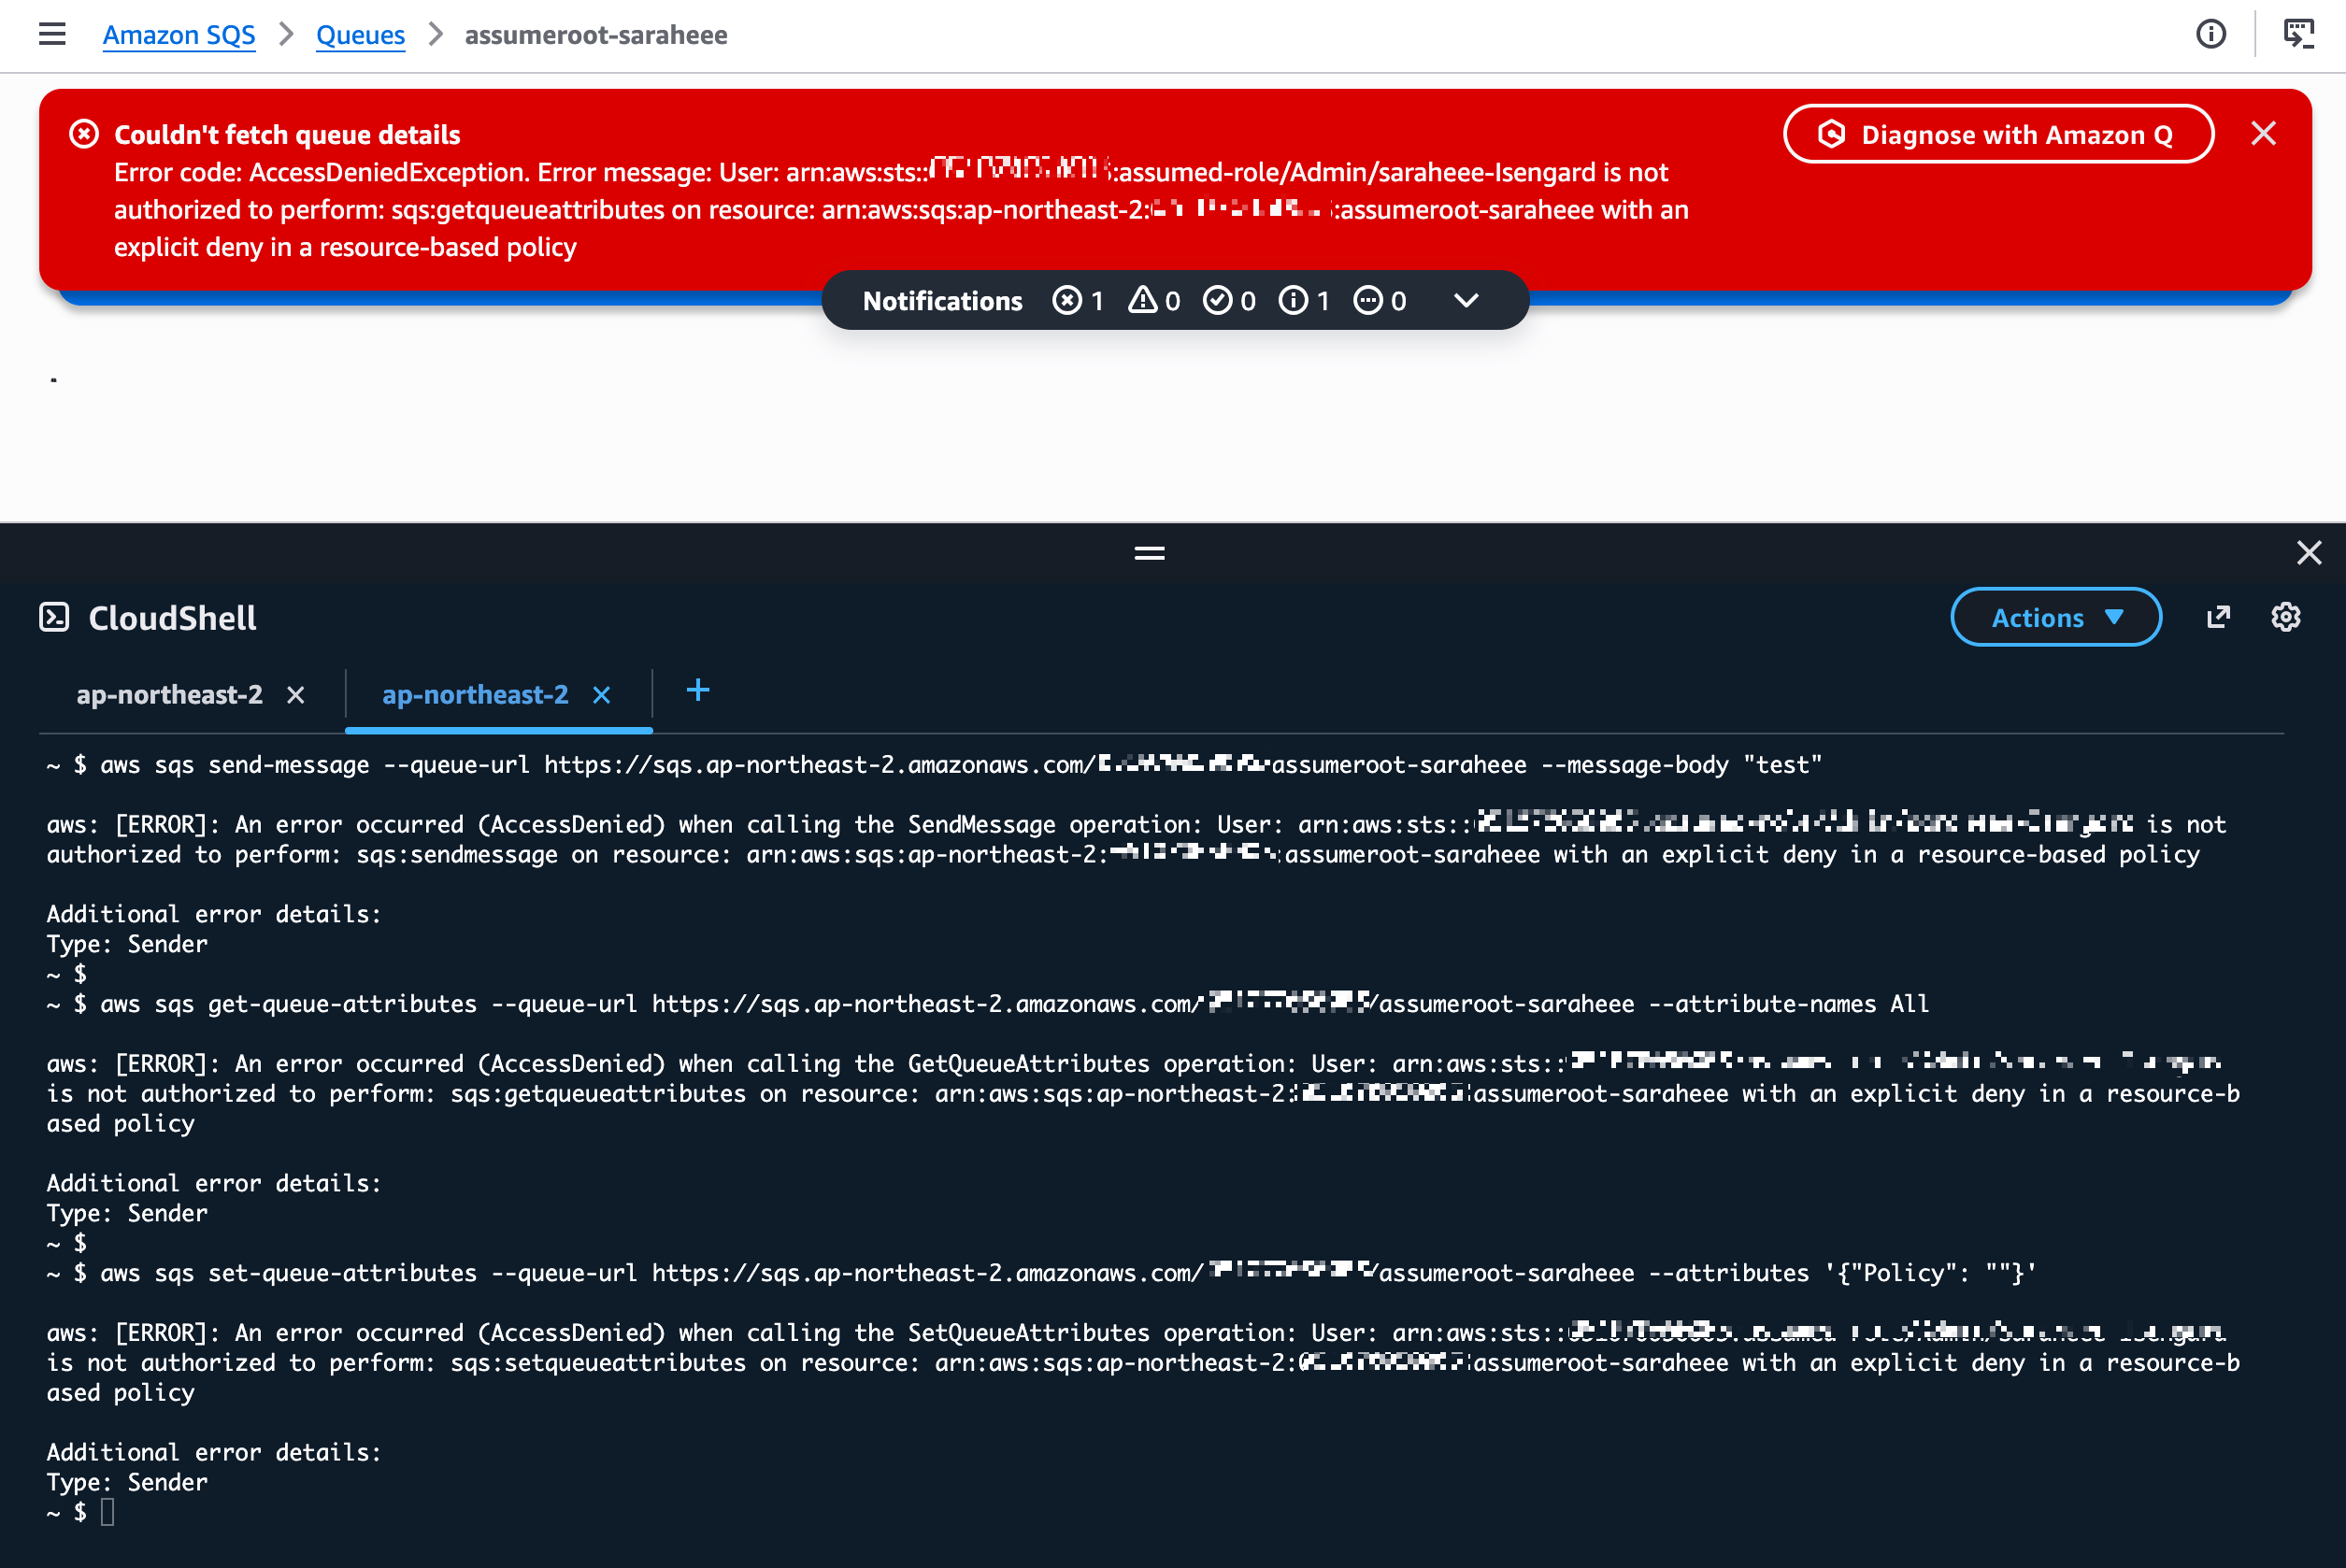
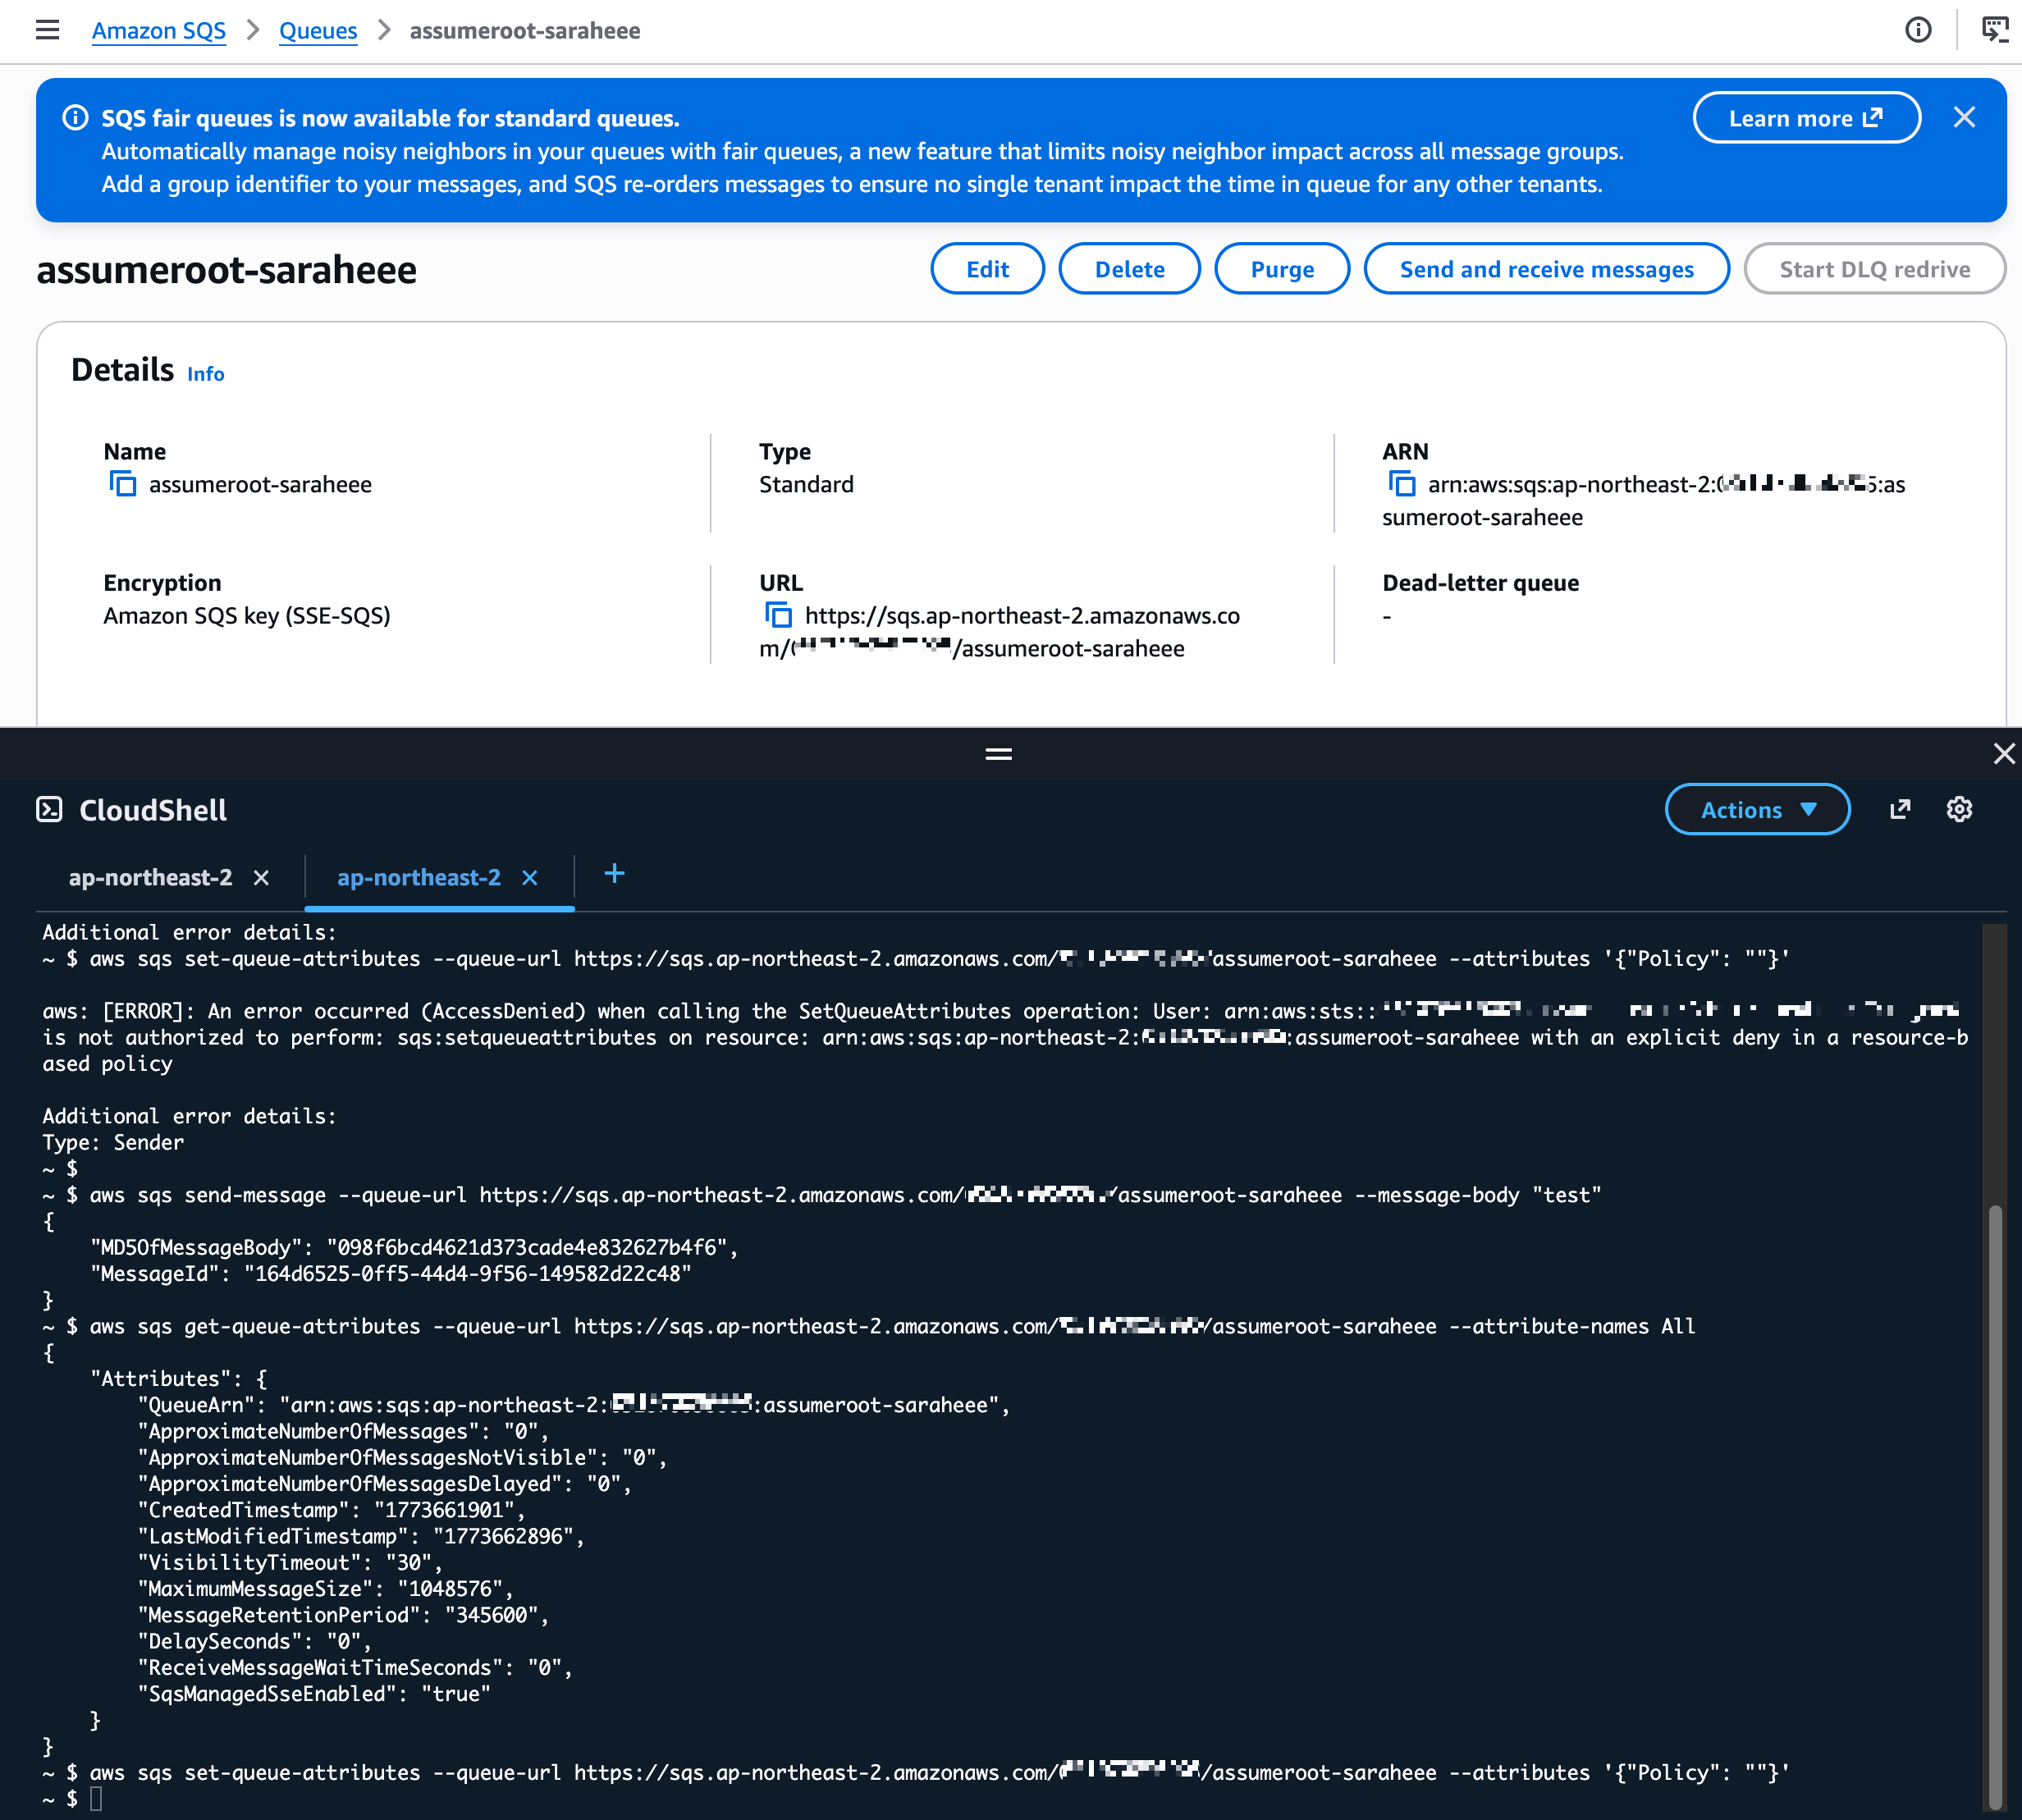
# 메시지 전송 시도
aws sqs send-message  --queue-url <https://sqs.ap-northeast-2.amazonaws.com/xxxxxxxxxxxx/assumeroot-saraheee> --message-body "test"

# 큐 속성 조회 시도
aws sqs get-queue-attributes --queue-url <https://sqs.ap-northeast-2.amazonaws.com/xxxxxxxxxxxx/assumeroot-saraheee> --attribute-names All

# 큐 정책 변경 시도 (빈 정책으로 삭제 시도)
aws sqs set-queue-attributes --queue-url <https://sqs.ap-northeast-2.amazonaws.com/xxxxxxxxxxxx/assumeroot-saraheee> --attributes '{"Policy": ""}'
Step 4. Take Privileged Action 수행 (관리/위임 계정)
관리 계정(또는 Delegated Admin 계정)의 콘솔에서 Root access management로 이동하여 Take privileged action을 수행합니다.
CLI 사용 시에는 sts:AssumeRoot API를 직접 호출합니다. (4.2절 참고)
Step 5. SQS 큐 정책 삭제 (Root 세션)
Delete SQS queue policy 작업을 선택하고, 잠긴 큐의 ARN을 지정하여 정책을 삭제합니다:
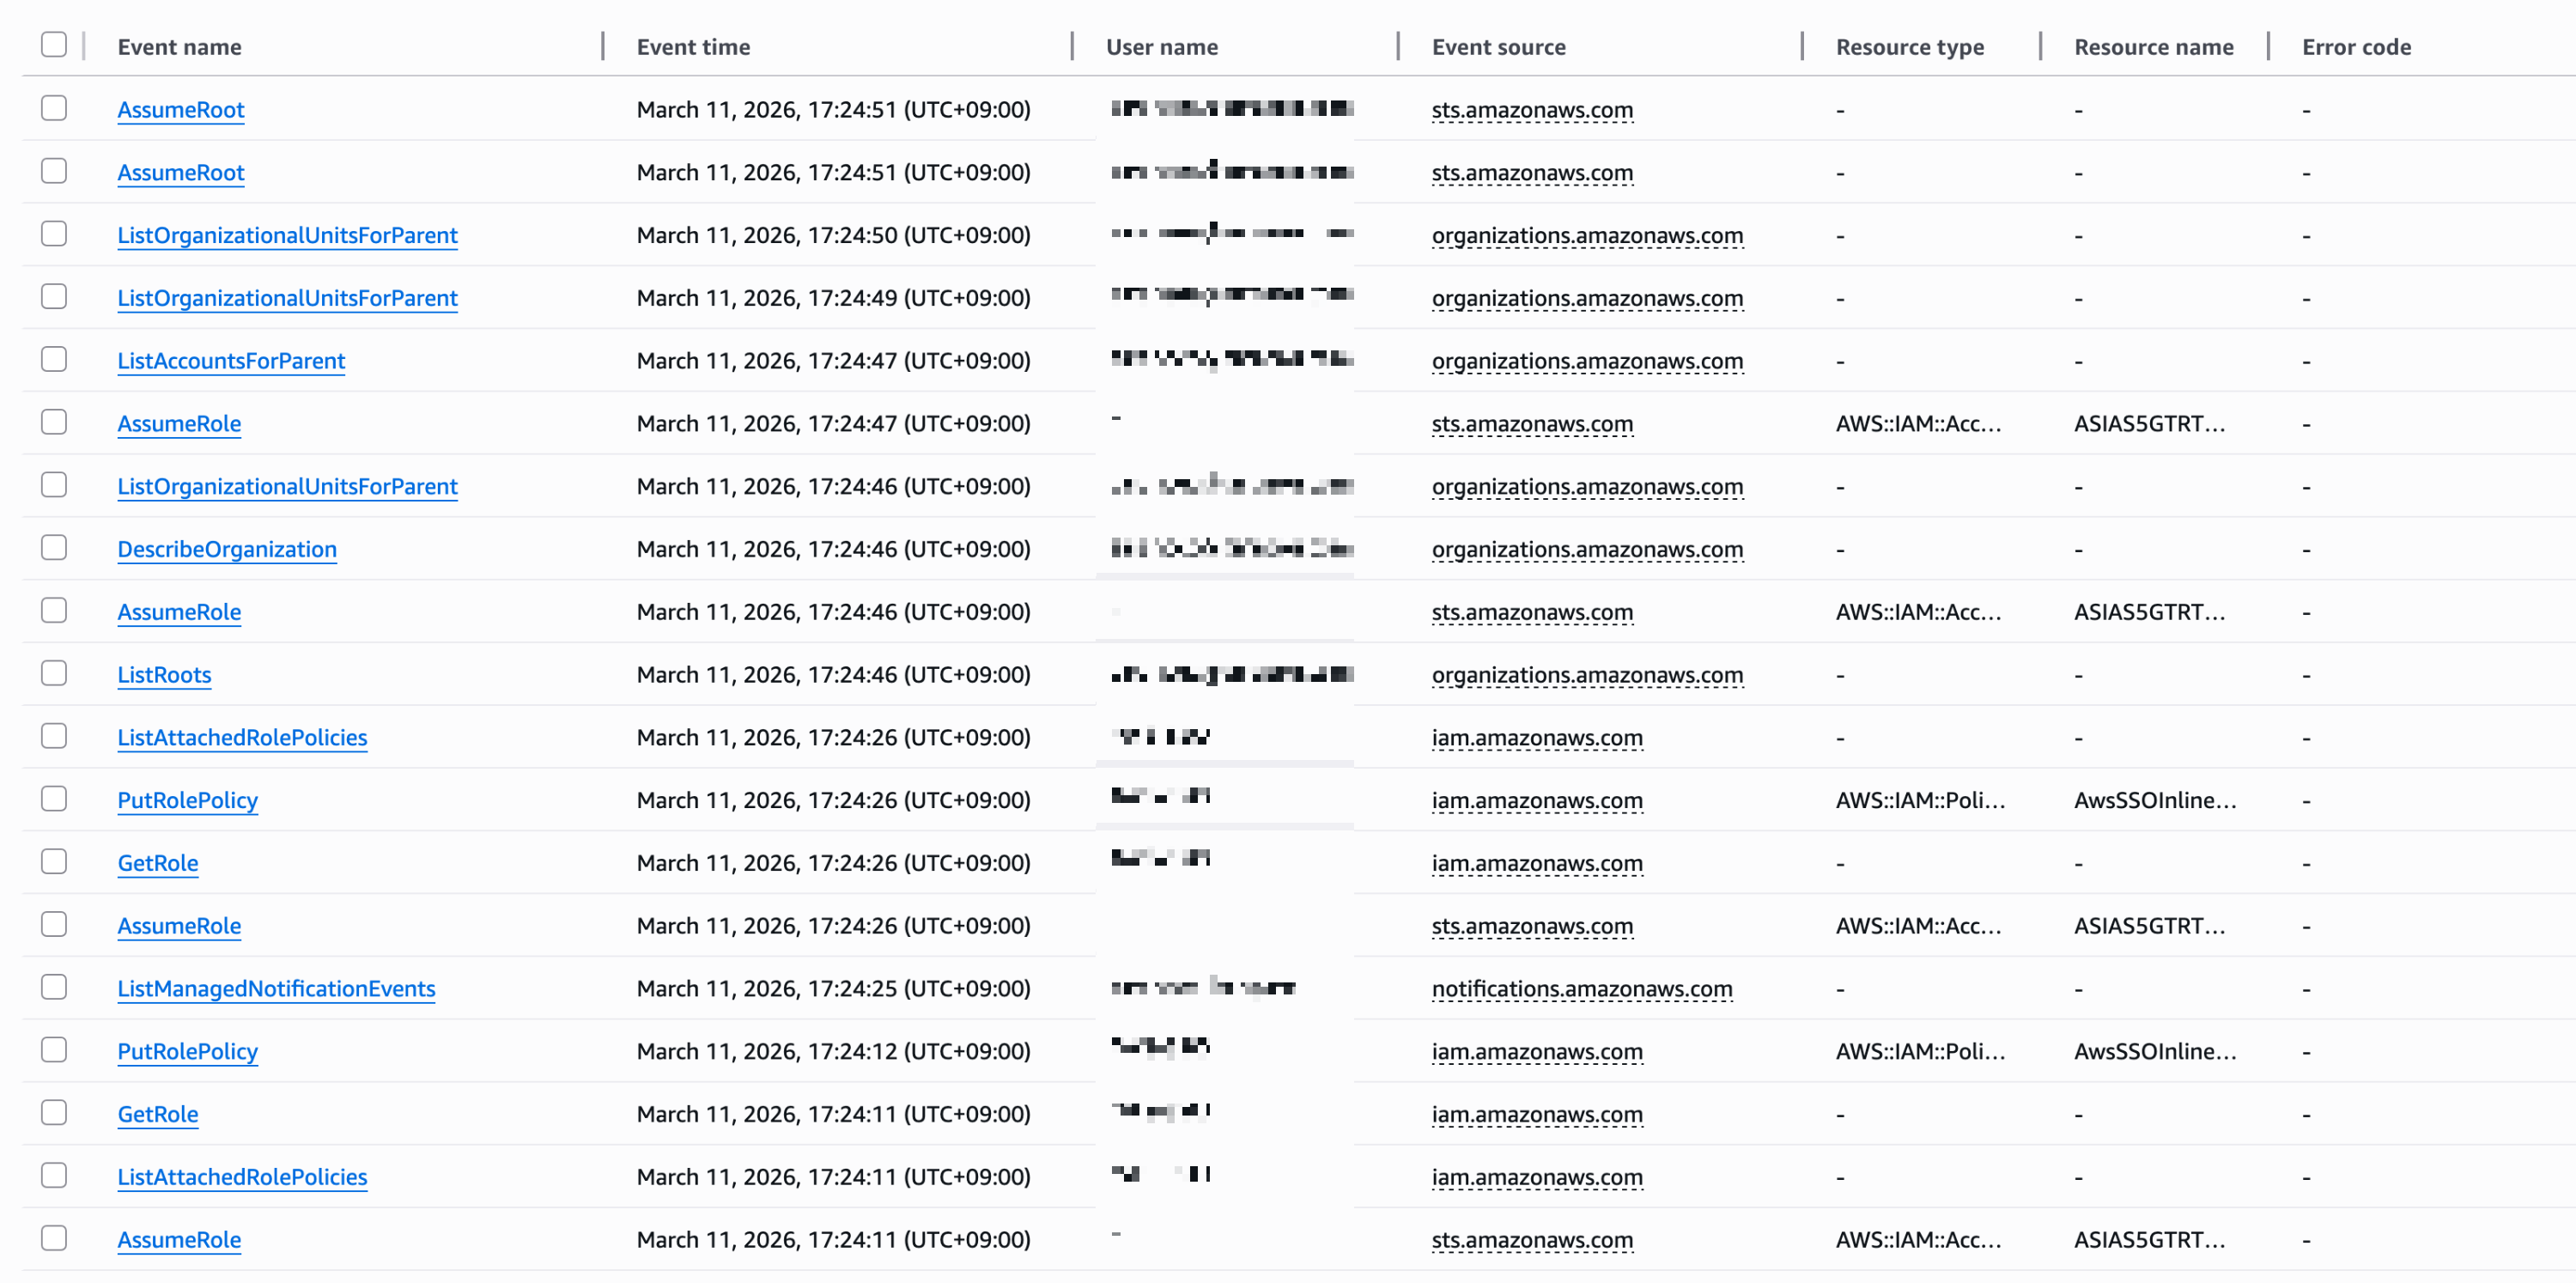
"errorMessage": "User: arn:aws:sts::xxxxxxxxxxxx:assumed-role/AWSReservedSSO_BreakGlassAssumeRoot_xxxxxxxxxxxxxxxx/saraheee@email.com is not authorized to perform: organizations:DescribeOrganization on resource: * because no identity-based policy allows the organizations:DescribeOrganization action",
(참고) 권한 부족 2.
We couldn't load the root of the organization.
You don't have permissions to see this resource, because the management account has not granted you the permissions to view accounts.
CloudTrail Event history
로그 에러
"errorMessage": "User: arn:aws:sts::xxxxxxxxxxxx:assumed-role/AWSReservedSSO_BreakGlassAssumeRoot_xxxxxxxxxxxxxxxx/saraheee@email.com is not authorized to perform: iam:GetOutboundWebIdentityFederationInfo on resource: * because no identity-based policy allows the iam:GetOutboundWebIdentityFederationInfo action",
organizations:DescribeOrganization
organizations:ListRoots
sso:ListInstances
iam:ListSTSRegionalEndpointsStatus
iam:GetOutboundWebIdentityFederationInfo
(참고) 권한 부족 3.
We couldn't load organizational units.
You don't have permissions to see this resource, because the management account has not granted you the permissions to view accounts.
An error occurred (InvalidRequestException) when calling the AssociateResolverQueryLogConfig operation: [RSLVR-01306] The resource is already associated with a query logging configuration that is sending query logs to the specified destination type. Trace Id: "1-689450aa-38d4c77e583b368f14ffa282"
버킷 삭제 시(Failed)
INTERNAL_SERVICE_ERROR[RSLVR-00200] Internal Service Error, trace ID: "1-6894513d-1a1dxxxxxxxxxxxxxxxx4477"
ACCESS_DENIED: Account is not authorized to perform this operation.
+ Additional settings: user/Amazon router peer IP, BGP 인증키 입력 후 생성
- AWS DX <-> onPrem connect 간 VIF 생성
5) 온프렘 라우터 설정 (VLAN 인터페이스 및 BGP Peering 설정)
# 라우터 버전 정보 확인
show version
# 설정 모드 진입
config terminal # or conf t
# 명령어 입력(exec) 모드로 나오기
end
라우터 콘솔 명령 - 인터페이스 IP 설정
- dot1Q: IEEE 802.1Q 표준, 802.1Q VLAN 태깅을 사용하여 VLAN 157에 대한 캡슐화 설정
# (config)#
interface InterfaceEthernet1.157
# (config-subif)#
encapsulation dot1Q 157
ip address 10.0.1.1 255.255.255.252
end
show ip interface brief
sh ip int br
Interface IP-Address OK? Method Status Protocol InterfaceEthernet1 unassigned YES NVRAM up up InterfaceEthernet1.157 10.0.1.1 YES manual up up
AWS 라우터까지 통신 확인
#ping 10.0.1.2
Type escape sequence to abort.
Sending 5, 100-byte ICMP Echos to 10.0.1.2, timeout is 2 seconds:
!!!!!
Success rate is 100 percent (5/5), round-trip min/avg/max = 1/1/2 ms
Your router peer IP: 10.0.1.1/30
Amazon router peer IP: 10.0.1.2/30
라우터에서 BGP peering 설정
- AWS console의 VIF 정보를 확인하여 BGP 설정
# AS 번호는 네트워크를 식별하는 고유 번호 # 64512-65534는 프라이빗 AS 번호 범위
# (config)#
# BGP 라우팅 프로세스 시작, 65000은 자신의 AS(Autonomous System) 번호
router bgp 65000
# (config-router)#
# BGP 피어(neighbor) 설정, 10.0.1.2: peer router의 ip 주소, 65011: 피어의 AS 번호
neighbor 10.0.1.2 remote-as 65011
neighbor 10.0.1.2 password BGPauthPW123!
# BGP로 광고할 네트워크 설정, 자신의 네트워크를 다른 AS에 알림
network 172.20.0.0 mask 255.255.0.0
end
(1) show ip bgp summary
AWS BGP peer 라우터(10.0.1.2)와 Peering이 정상적으로 이루어졌는지 확인
정상인 경우 'State/PfxRcd'에 전달받은 Prefix의 개수가 표시됨
# bgp peer(neighbor) 연결 상태
show ip bgp summary
# results
BGP router identifier 172.20.57.1, local AS number 65000
BGP table version is 4, main routing table version 4
3 network entries using 744 bytes of memory
3 path entries using 408 bytes of memory
2/2 BGP path/bestpath attribute entries using 576 bytes of memory
1 BGP AS-PATH entries using 24 bytes of memory
0 BGP route-map cache entries using 0 bytes of memory
0 BGP filter-list cache entries using 0 bytes of memory
BGP using 1752 total bytes of memory
BGP activity 3/0 prefixes, 3/0 paths, scan interval 60 secs
3 networks peaked at 18:02:26 May 14 2025 KST (4d19h ago)

Neighbor        V           AS MsgRcvd MsgSent   TblVer  InQ OutQ Up/Down  State/PfxRcd
10.0.1.2        4        65011   14335   15133        4    0    0 4d19h           2
(2) show ip bgp
AWS 측 라우터(10.0.1.2)로부터 전달받은 Prefix를 확인
VGW1와 VGW2에 연결된 VPC1와 VPC2의 CIDR 대역(10.1.1.0/24, 10.1.2.0/24)이 온프렘 라우터로 전파된 것 확인
# bgp로 전달 받은 경로
show ip bgp

BGP table version is 4, local router ID is 172.20.57.1
Status codes: s suppressed, d damped, h history, * valid, > best, i - internal,
              r RIB-failure, S Stale, m multipath, b backup-path, f RT-Filter,
              x best-external, a additional-path, c RIB-compressed,
              t secondary path, L long-lived-stale,
Origin codes: i - IGP, e - EGP, ? - incomplete
RPKI validation codes: V valid, I invalid, N Not found

     Network          Next Hop            Metric LocPrf Weight Path
 *>   10.1.1.0/24      10.0.1.2                               0 65011 i
 *>   10.1.2.0/24      10.0.1.2                               0 65011 i
 *>   172.20.0.0       0.0.0.0                  0         32768 i

# 라우터에서 참조하는 라우팅 경로
show ip route
# Amazon Linux, RHEL의 경우
sudo systemctl status amazon-ssm-agent
sudo systemctl restart amazon-ssm-agent

# 로그 확인
sudo tail -f /var/log/amazon/ssm/amazon-ssm-agent.log

# Ubuntu의 경우
sudo service amazon-ssm-agent status
sudo service amazon-ssm-agent restart
$ python --version		# Python 3.8.20
$ pip show ryu			# Version: 4.30
$ pip show setuptools		# Version: 56.0.0
$ pip show eventlet		# Version: 0.30.2
5단계: 실험 진행
# RTT 측정
mininet> h1 ping h2

# 정찰 공격 시뮬레이션
mininet> h3 nmap -sP 10.0.0.0/24
실제 IP 변경은 iptables NAT 규칙으로 시뮬레이션 가능
실제 SCADA/PLC 장비 대신 Modbus 시뮬레이터 (ex. mbtget)로 구성 가능
mininet> h1 ping -c 10 h2 PING 10.0.0.2 (10.0.0.2) 56(84) bytes of data. 64 bytes from 10.0.0.2: icmp_seq=1 ttl=64 time=0.059 ms 64 bytes from 10.0.0.2: icmp_seq=2 ttl=64 time=0.053 ms 64 bytes from 10.0.0.2: icmp_seq=3 ttl=64 time=0.053 ms 64 bytes from 10.0.0.2: icmp_seq=4 ttl=64 time=0.060 ms 64 bytes from 10.0.0.2: icmp_seq=5 ttl=64 time=0.054 ms 64 bytes from 10.0.0.2: icmp_seq=6 ttl=64 time=0.058 ms 64 bytes from 10.0.0.2: icmp_seq=7 ttl=64 time=0.052 ms 64 bytes from 10.0.0.2: icmp_seq=8 ttl=64 time=0.055 ms 64 bytes from 10.0.0.2: icmp_seq=9 ttl=64 time=0.053 ms 64 bytes from 10.0.0.2: icmp_seq=10 ttl=64 time=0.062 ms
--- 10.0.0.2 ping statistics --- 10 packets transmitted, 10 received, 0% packet loss, time 9205ms rtt min/avg/max/mdev = 0.052/0.055/0.062/0.003 ms
mininet> h3 nmap -sP 10.0.0.0/24 Starting Nmap 7.80 ( https://nmap.org ) at 2025-04-22 13:52 UTC Nmap scan report for 10.0.0.1 Host is up (0.022s latency). MAC Address: 56:DF:00:DC:C1:17 (Unknown) Nmap scan report for 10.0.0.2 Host is up (0.020s latency). MAC Address: E2:2C:BE:AF:84:BD (Unknown) Nmap scan report for 10.0.0.4 Host is up (0.014s latency). MAC Address: 92:A7:6C:25:F8:8B (Unknown) Nmap scan report for 10.0.0.3 Host is up. Nmap done: 256 IP addresses (4 hosts up) scanned in 27.95 seconds
# named.conf 수정
sudo vi /etc/named.conf

options {
        listen-on port 53 { any; };  # fixed
        listen-on-v6 port 53 { none; };  # or default (::1;)
        directory       "/var/named";
        dump-file      "/var/named/data/cache_dump.db";
        statistics-file "/var/named/data/named_stats.txt";
        memstatistics-file "/var/named/data/named_mem_stats.txt";
        allow-query     { any; };  # fixed
        recursion yes;

        dnssec-validation auto;
        auth-nxdomain no;  # fixed
};
요청한 도메인이 존재하지 않을 때 반환하는 DNS 코드 - no: RFC 표준 준수 (권장)
3. zone 파일 생성
# /var/named/example.com.zone 생성
sudo vi /var/named/example.com.zone

$TTL    86400
@       IN      SOA     ns1.example.com. admin.example.com. (
                        2023011001      ; Serial
                        3600            ; Refresh
                        1800            ; Retry
                        604800          ; Expire
                        86400 )         ; Minimum TTL

@       IN      NS      ns1.example.com.
@       IN      A       192.168.1.10
ns1     IN      A       192.168.1.10
www     IN      A       192.168.1.20
4. zone 설정을 named.conf에 추가
# /etc/named.conf에 추가
zone "example.com" IN {
        type master;
        file "example.com.zone";
        allow-update { none; };
};
# 문법 체크
sudo named-checkconf
sudo named-checkzone example.com /var/named/example.com.zone
# - zone example.com/IN: loaded serial 2023011001
# - OK

# 서비스 시작
sudo systemctl start named
sudo systemctl enable named
# - reated symlink /etc/systemd/system/multi-user.target.wants/named.service → /usr/lib/systemd/system/named.service.
sudo systemctl status named
Your IPAM is not discovering your organiziation's resources. For IPAM to discover resources in your entire organization you must delegate an account in your organization as the IPAM administrator. You cannot delegate the organization management account as the IPAM administrator.
ALB는 수신하는 트래픽 처리를 위해 Scaling 동작을 수행하며 ALB 서비스 도메인에 대한 IP 주소가 동적으로 변경된다 [1].
1) Global Accelerator를 사용하면 고정 IP 확보는 가능하나 비용 효율적이지 않다 [2].
Global Accelerator 생성 시 기본적으로 2개의 고정 IP가 자동으로 할당된다. ALB를 엔드포인트로 추가하여 Global Accelerator의 두 고정 IP를 통해 ALB로 트래픽이 전달되도록 설정하실 수 있다.
2) ALB 앞 NLB를 사용하여 NLB의 대상으로 ALB를 연결할 수 있도록 배치하여 고정 IP를 사용하는 것과 동일한 효과를 얻을 수 있다 [3].
1), 2) 상세 내역 [4]
3) 2025-03-07 업데이트된 내역을 통해, ALB가 IPAM과의 통합을 통해 ALB 노드에 IP 주소 할당을 위한 Public IPv4 주소 풀을 제공할 수 있게 되었다. 고객 소유의 BYOIPs (Bring Your Own IP addresses) 또는 Amazon에서 제공하는 인접한 IPv4 주소 블록으로 구성할 수 있는 공용 VPC IP Address Manager (IPAM) 풀을 구성할 수 있다. 이 때 ALB의 IP 주소는 IPAM 풀에서 소싱되며, 혹여 공용 IPAM 풀이 고갈되면 자동으로 AWS 관리형 IP 주소로 전환된다.
- sg: ssh anywhere, dns (udp) 192.168.0.0/16, icmp 192.168.0.0/16
3. VPN 설정
1) Virtual private gateway (cloud-vgw)
2) Customer gateways (onprem-cgw) - onprem-vpn-server의 public IP address (Specify the IP address for your customer gateway device's external interface.)
 % sudo su
sh-3.2# ssh -i "ap-south-1-keypair.pem" ec2-user@35.154.187.78
The authenticity of host '35.x.x.x (35.x.x.x)' can't be established.
ED25519 key fingerprint is SHA256:qOx9yHXTxD6xaC9BfiT/Y5/82Ml/mVZzr5hNXnw9FQ8.
This key is not known by any other names.
Are you sure you want to continue connecting (yes/no/[fingerprint])? yes
Warning: Permanently added '35.x.x.x' (ED25519) to the list of known hosts.
   ,     #_
   ~\_  ####_        Amazon Linux 2023
  ~~  \_#####\
  ~~     \###|
  ~~       \#/ ___   https://aws.amazon.com/linux/amazon-linux-2023
   ~~       V~' '->
    ~~~         /
      ~~._.   _/
         _/ _/
       _/m/'
[ec2-user@ip-192-168-0-220 ~]$
sudo yum install libreswan sudo vi /etc/sysctl.conf
1) Open /etc/sysctl.conf and ensure that its values match the following: net.ipv4.ip_forward = 1 net.ipv4.conf.default.rp_filter = 0 net.ipv4.conf.default.accept_source_route = 0
2) Apply the changes in step 1 by executing the command 'sysctl -p'
sudo sysctl -p
3) Open /etc/ipsec.conf and look for the line below. Ensure that the # in front of the line has been removed, then save and exit the file. #include /etc/ipsec.d/*.conf
이미 제거된 상태로 저장됨
cat /etc/ipsec.conf
4) Create a new file at /etc/ipsec.d/aws.conf if doesn't already exist, and then open it. Append the following configuration to the end in the file: #leftsubnet= is the local network behind your openswan server, and you will need to replace the <LOCAL NETWORK> below with this value (don't include the brackets). If you have multiple subnets, you can use 0.0.0.0/0 instead. #rightsubnet= is the remote network on the other side of your VPN tunnel that you wish to have connectivity with, and you will need to replace <REMOTE NETWORK> with this value (don't include brackets).
5) Create a new file at /etc/ipsec.d/aws.secrets if it doesn't already exist, and append this line to the file (be mindful of the spacing!): 35.x.x.x 13.x.x.x: PSK "TOC3RK--------------------IUtns"
sudo vi /etc/ipsec.d/aws.secrets
Tunnel 1 구성 완료
sudo systemctl start ipsec.service sudo systemctl status ipsec.service