# named.conf 수정
sudo vi /etc/named.conf

options {
        listen-on port 53 { any; };  # fixed
        listen-on-v6 port 53 { none; };  # or default (::1;)
        directory       "/var/named";
        dump-file      "/var/named/data/cache_dump.db";
        statistics-file "/var/named/data/named_stats.txt";
        memstatistics-file "/var/named/data/named_mem_stats.txt";
        allow-query     { any; };  # fixed
        recursion yes;

        dnssec-validation auto;
        auth-nxdomain no;  # fixed
};
요청한 도메인이 존재하지 않을 때 반환하는 DNS 코드 - no: RFC 표준 준수 (권장)
3. zone 파일 생성
# /var/named/example.com.zone 생성
sudo vi /var/named/example.com.zone

$TTL    86400
@       IN      SOA     ns1.example.com. admin.example.com. (
                        2023011001      ; Serial
                        3600            ; Refresh
                        1800            ; Retry
                        604800          ; Expire
                        86400 )         ; Minimum TTL

@       IN      NS      ns1.example.com.
@       IN      A       192.168.1.10
ns1     IN      A       192.168.1.10
www     IN      A       192.168.1.20
4. zone 설정을 named.conf에 추가
# /etc/named.conf에 추가
zone "example.com" IN {
        type master;
        file "example.com.zone";
        allow-update { none; };
};
# 문법 체크
sudo named-checkconf
sudo named-checkzone example.com /var/named/example.com.zone
# - zone example.com/IN: loaded serial 2023011001
# - OK

# 서비스 시작
sudo systemctl start named
sudo systemctl enable named
# - reated symlink /etc/systemd/system/multi-user.target.wants/named.service → /usr/lib/systemd/system/named.service.
sudo systemctl status named
sudo yum install nginx
cd /etc && ls | grep nginx // check settings

sudo mkdir /etc/nginx/sites-available
sudo mkdir /etc/nginx/sites-enabled
2. Setting up config
1) nginx.conf 수정 : nginx 관련 설정을 블록 단위로 설정, sites-enable에 존재하는 파일 불러옴
sudo vi /etc/nginx/nginx.conf

    include /etc/nginx/sites-enabled/*.conf;

#    server {
#        listen       80;
#        listen       [::]:80;
#        server_name  _;
#        root         /usr/share/nginx/html;
#
#        # Load configuration files for the default server block.
#        include /etc/nginx/default.d/*.conf;
#
#        error_page 404 /404.html;
#        location = /404.html {
#        }
#
#        error_page 500 502 503 504 /50x.html;
#        location = /50x.html {
#        }
#    }
2) server 설정 : nginx 최신 버전을 따로 설치하지 않고 기본 설정된 repository에 있는 버전을 install nginx로 바로 설치한 경우에는 nginx 환경 설정 파일 위치가 /etc/nginx/sites-available/default로 설정됨, 최신 버전을 설치했을 경우 /etc/nginx/conf.d/default.conf [5]
sudo vi /etc/nginx/sites-available/default.conf

    server {
        listen 80;
        location / {
                root /project/nginx-project;  // path to deploy
                index index.html index.htm;
                try-files $url $url/ /index.html;
        }
    }
3) symbolic link 설정 : sites-enabled directory에 default.conf 바로가기 생성 sites-available에 존재하는 설정 파일들 중, 사용하는 설정 파일만 link해서 사용할 수 있도록 하는 디렉터리
cd /etc/nginx/sites-enabled
sudo ln -s /etc/nginx/sites-available/default.conf
ls -l
total 0 lrwxrwxrwx. 1 root root 39 Jul 30 04:42 default.conf → /etc/nginx/sites-available/default.conf 4) 웹서버 html 설정
sudo vi /project/nginx-project/index.html

<!DOCTYPE html>
<html>
<head>
    <title>Welcome to Nginx!</title>
</head>
<body>
    <h1>Welcome to Nginx!</h1>
    <p>If you see this page, the Nginx web server is successfully installed and working.</p>
    <p>Further configuration is required.</p>
</body>
</html>
3. Run the server
sudo systemctl start nginx
오류 시 status : Failed to start nginx.service - The nginx HTTP and reverse proxy server
sudo systemctl start nginx
Job for nginx.service failed because the control process exited with error code. See "systemctl status nginx.service" and "journalctl -xeu nginx.service" for details.
: 80번 포트에 수신 대기중인 프로세스 삭제
fuser -k 80/tcp
4. Prepare SSL/TLS Certificate
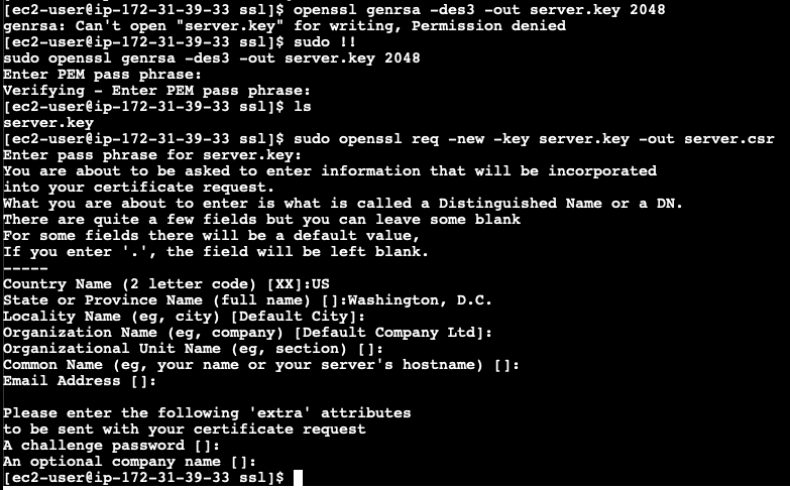
- Generate a self-signed certificate or obtain a certificate from a Certificate Authority (CA) 1) Ensure that OpenSSL is installed on your operating system
openssl version
nginx가 ssl 적용이 가능한 모듈이 있는지 확인 (--with-http_ssl_module)
- -days 3650: 3650일짜리(10년) 인증서 - -in server.csr -signkey server.key: 개인 키와 서버 요청서를 가지고 인증서 server.crt 생성
5. Configure the Nginx configuration file
- Add the following HTTPS-related settings inside the server block: - Use the listen directive to specify port 443 - Use the ssl_certificate and ssl_certificate_key directives to specify the paths to the certificate files
→ The private key has a passphrase requirement but nginx is not configured to use a passphrase.
7. delete key passphrase
1) Rename the existing server.key filename to server_pass.key
mv server.key server_pass.key
2) Create a new key without a passphrase requirement. It is assumed that the RSA key in use, otherwise adjust the command accordingly. When prompted, type the passphrase and press enter
openssl rsa -in server_pass.key -out server.key
3) Stop, start nginx service and check that no error message are displayed
8. local test - www.example.com은 공인된 도메인이 아니라 사내에서 사용할 가상 도메인이므로 클라이언트 측 도메인에 대한 hosts 파일을 등록해야 함
9. (optional) Additional SSL/TLS-related Settings - Use the ssl_session_cache and ssl_session_timeout directives to configure the SSL session cache - Use the ssl_prefer_server_ciphers direcactive to prefer the server's cipher suites - Use the add_header directive to add security-related headers
10. Test Configuration and Restart Nginx - Use the nginx -t command to check the syntax of the configuration file - Use the systemctl restart nginx command to restart the Nginx service